Wednesday, 3 August 2022

Bowser’s Front Yard Part 3: Building A Garden, Embracing Slow Living, And A Wood Burning Hot Tub Debate

Well well well, here I am with another process post. I swear one of these days we are going to get to some reveals but this is what happens when you have too many projects and limited time…and money. Honestly, though, it’s more than just that, I prefer to be a little slower and more thoughtful with my life in general. I like to process, to mull, to Marco Polo with my five closest friends, before going into action. I’m not indecisive, in fact, I’m quite decisive which is something that saves me, especially because my job is making on-the-ball, problem-solving decisions basically all day. I would say that I am…considered? Deliberate? Reasoned? I like to think things through. Funny enough, I typically think about things for a while and then at the last minute, make an off-the-cuff, gut decision that may be the opposite of what I had been thinking through. It’s hard to explain but I think that it’s easy for me to do that because I have thought through every possibility so when it comes to a decision, I can be like “YES, THAT”.

I digress. Point is, my personality type IS slow living. Like, not #slowliving #selfcare but real, true, slow living. Have you ever talked to your BF for an hour about the best way to strip your sheets? Does it take you 4 hours to do your morning routine, 4 hours to do your nighttime routine, and then you wonder how you are supposed to get everything else done in your remaining 4 hours? Do you know 5 different ways to clear your lymph nodes – AND practice them?? You may be a self-pres 9 on the Enneagram. IT. ME.

It’s interesting that I live in a city and I’ve always loved them. I think cities help balance me in a weird way. I don’t know if it will always feel that way, but I think for my 20s for sure, and for the time being, living in proximity to fast-paced energy is good for me. That said, I have had to create a haven around me to stay grounded, especially in the past couple of years. My home is my safe space, whether it was a tiny apartment or (a just as tiny) home (ha). Even though I don’t live in the mountains or hand dye all my homemade clothes with ingredients from my garden, I picture myself wearing an apron with kittens popping out of it, being followed around by a deer and a bird that adopted me (DO YOU FOLLOW @brownhikingtrails??? Some people have all the luck…). Maybe by the time you’re reading this, I will be though. God, what a dream. ALAS, the point is, my continual quest is: how can I bring that “I have a deer friend” energy to my life, here & now?

That’s the theme of today’s process post. We’re talking urban gardens and *drum roll* GOODLAND WOOD FIRED TUBS. You know if you were in the comment section last time 🙂

Let’s start where we ended last time, it is May 9th and we were here:

Here’s our empty plot (if 16’x16’ can be considered a “plot”) of land. She is smol but if you’ve lived in a city and especially if you have lived in an apartment for long periods of time, 16’x16’ can be a farm, and today folks – it IS. Well, it’s on its way to being one anyway, let’s dig in (pun intended).

I had my landscaper bring in the dirt because I also needed him to do some draining along the front wall. It’s not very exciting and I don’t have pics because I was working, but basically, he dug out the front wall area (6” wide), put some chicken wire and weed barrier down, and filled it with rocks. That way when it rains and the water needs to go somewhere it will filter through there and won’t clog the drainage holes that are in the front wall with dirt.

As you can tell from the pictures, adding in the dirt and leveling it brought it up pretty high, a lot higher than I was expecting. The front wall that is along the sidewalk is 29” high, and now the dirt comes up so it’s only 10” high on our side of the wall. In ways this is good, when I plant something along the front wall it won’t have to grow as tall to create that half wall/half greenery thing I was going for, however, I knew I wanted to put in a raised bed and now it is going to be a lot more raised than I was expecting. Also, there’s now a feeling like you could trip and fall out of the yard and onto concrete. Hmm…

AH WELL, this is what we’re working with now.

So next I ordered ¾” del rio pebbles. I told them the size of the space and how many inches deep I wanted them and Y’ALL they gave me SO. MANY. ROCKS. I think I was swindled. They are not returnable and they wouldn’t buy back so now Sara Tramp (who came over and took the excess) has too many rocks. 

It blew my mind that the dump truck guy couldn’t figure out how to dump them INTO the space, causing us to have to shovel them in 100-degree heat, but I guess since we only used half that’s fine.

We bought some heavy-duty landscape fabric from our local ACE Hardware to help with weeds growing through the rocks and put in a simple 2” edging to keep them in place. I went for this one simply because it’s easy to install.

Next, we shoveled and shoveled and shoveled. I’m not joking when I say it was 100 degrees. We were having a wacky early heat wave and unfortunately Down to Farm was coming the next day to build the planter so we just had to get it done. No joke: I would shovel 25 scoops, go inside, drink water, and do house chores for 15 minutes, and then come out and do it again. That’s all you could do at one time. We worked on this from 11 am-8 pm.

so hot.
fin! made an indent where I thought the planter would go
so many leftover rocks

Let’s talk about Down to Farm for a minute. I found out about them through Barrett Prendergast when Sara and I shot her kitchen last year for the blog. I noticed she had a beautiful raised bed in her backyard and asked her about it. I’ve kept Down to Farm in the back of my mind ever since. Their mission is to “make growing food fun, not overwhelming. Make your garden bed a happy place, not a chore. Most importantly, make growing food part of your life”. Eden (I know, how could she NOT run an urban farming business with that name) is newer to farming. She hasn’t spent her whole life doing this which makes her feel approachable when you have 100 dumb questions (there are no dumb questions but you know what I mean) and also makes you feel like it is possible for you to be successful as well. DTF offers an array of services, from just setting you up with raised beds, to basically hand holding your way through the entire process (guess what I’m going to go with).

When I decided the front would be a perfect space to do some planting, I reached out and Eden came by to check out the space. She recommended an 8×3′ L-shaped planter and a few potted plants that wouldn’t grow as well with others (think mint, blueberries, and a lime tree). I kept an eye out for a few weeks to see what the sun did out there so we could know where to put it. Initially, we were thinking the L would go on the right front side (if you’re looking at the house) but as I paid attention, the left got more solid sun because the fence would block the other side at a certain point. I expressed that I wanted something to cover up the backside of the neighbor’s fence but I didn’t want to continue the hedge. Mostly I didn’t want to have to constantly trim it because I didn’t want it to get that high out front. Also, I thought it would be nice if everything in the front was edible, just as an exercise. Eden thought a passion fruit vine would be a good choice as it grows very quickly, has fruit (obvs), and is a nice-looking plant. Being that I am from Maryland, when I moved to LA 13 years ago there were quite a few plants that blew my mind, but passion fruit was probably the most insane to me. Have you seen the flowers??

I have no idea what I will do with that much passion fruit (probably give it away) but if you’re telling me it will cover up the backside of the fence quickly, I’m in.

On May 16th the DTF team came and started building the raised bed and I stalked them from my window 🙂

they used solid redwood so that it will last a long, long time. 

They ended up scraping the rocks away in that area (oops) and it was around this time that it dawned on me that the planter was going to be higher than the wall. Remember when I said I liked to think things through? Oops. It’s not going to be a problem along the front wall because there will eventually be plants there but we put the bed right against the edge (on the right in these photos) to give us as much real estate as possible in the 16’x16’ square. Hmmm…ah well. I’ll have to figure out a way to make that look more purposeful. The good thing about the bed being high is that it gets more sun. The fence, and when the wall was taller (before we added dirt), cast more of a shadow early and late in the day than you would think.

This is the final stage, they’ve added dirt and they are attaching the top piece of the frame. Apparently, they work with a guy who specializes in dirt. It’s like dirt gold that is ideal for growing the most delicious and nutritious food. Speaking of, we are going to take a sojourn and talk about composting and dirt.

During the pandemic, I decided I was going to start composting, as one did during that time. Los Angeles has a terrible sanitization system in my opinion. It is WAY behind the curve of similar big cities in the world. For example, my friend Lauren who lives in Seattle has been composting through the city for YEARS and in fact, you can be fined there if you don’t separate your recycling/trash/compost properly. I did a little research and bought a tumbling composter which I thought would be better for keeping animals and smells at bay. It works, but it works too slowly. The smell isn’t too bad, but it’s not great either. I have to keep it on the side of my house so when the juices inevitably leak from it, they leak onto the concrete which isn’t ideal. This would be helped greatly if it could be on grass or mulch but we simply don’t have a space where it could live and not be an eyesore or too close to windows where people may catch a whiff. At this point it has been completely full on both sides for a year and still hasn’t turned into compost I could put in my garden. I’m going to have to do some further research on how I can speed up that process with worms or adding bacteria or something but all in all I would say it’s a quasi-fail and isn’t going to answer my urban composting problems.

This led me to some deeper googling where I found the GoFundMe for the Lomi composter and became a backer. I totally forgot about it until I got an email late last year saying mine was on its way. I NOW AM A LOMI SPOKESPERSON. Not really, but I should be. All I can say is, check it out. I’m in love. It lives on my washing machine which is close to my kitchen and I use it every other day, if not more. I’ll show you on my Instagram stories today.

she’s cute (and I don’t *just* mean daffy)

Back to the raised bed…

Fin! Just LOOK at how many rocks Sara’s husband Macauley and her brother Shade had to shovel out of my driveway. Good God what an annoying job. Luckily DTF did use some of the leftovers inside the planter for drainage purposes. We have a bunch of those bigger rocks we used along the edge in our back yard because you can only buy them by the ton and when we landscaped back there we had a surplus. Adding them on top of the edging we put in made it so we could bring up the depth of the stones to 3-4 inches instead of 2. If you’re wondering why we went with stone here and not grass, it really just came down to cost. I think once everything along the edge has green things in them it won’t feel so sad.

Speaking of, they came back on May 22nd and planted the garden in the raised bed…

I told Eden to plant what she thought would live. We were getting a bit late in the season, plus we were having some heat waves that made it more difficult to keep things alive. She planted a mixture of: tomatoes, green beans, squashes, chards, peppers, basil, cilantro, oregano, sage, rosemary, thyme, and chives. 

Eden put the irrigation in herself. It’s connected to my hose (which is to the right of the back gate) with a timer and can handle the whole front yard area. 

I’ll be honest, not all the plants have made it. We lost the marigolds that were planted to keep the bugs away, the green beans, a couple of squash plants, and the cilantro went to seed immediately. When the passion fruit went in this week we cleaned out the dead and are nursing some back to health after being fried early on. The tomatoes and peppers are producing and I enjoy picking off herbs when I need them in the kitchen. Shockingly the chards are doing OK. They fried early on but seem to have rallied. We’re going to pivot and start planning for a fall planting but I think for a first go at it, a little late in the season, we are doing ok! These photos were taken two days ago…

As you can see, the passion fruit and wire have been planted and installed. They put in 2 plants and from what I understand, they will grow in so extremely fast that hopefully by the time we shoot the reveal, you’ll barely be able to see the fence. Honestly, even that amount of green is making me so much happier.

Playing with pots I already own, I’m trying to figure out what I can use and what I need to find. I’m hoping to collect vintage pots from the flea markets this month. I’ve also been looking at Veradek’s planters, I especially like the corten steel ones, if I need something with a bit more volume. 

Now we haven’t talked about this awkward amount of space I have on the concrete “landing” once you go up the steps…

You can see plainly here that I need to continue the planters on this side so no one trips and falls face-first into my driveway. I thought the Veradek planters may work here to act as a barrier near the steps and to fill the far right corner you see here as well (near the chair). Don’t pay attention to the hose situation near the gate. I clearly need a hose holder to organize everything over there. The jasmine by the steps is doing ok, my landscaper is supposed to come this week and install wire on the stucco so it can spread out before it grabs onto the railing. The rosemary and sage I planted next to the jasmine aren’t too happy because there’s a grasshopper that is living there and eating it. He’s too cute for me to kill but I should probably transplant him 🙂

Here’s a straight-on shot, it’s actually very nice to have the wide stairs and walkway up, especially when two people are walking to the back at the same time, but the back-right corner is a waste. Maybe this planter?

I think it would be a good way to use the space, it’s not quite big enough for furniture, but too big for the purposes of walking. Speaking of furniture, this setup is temporary. I’ve decided I want a round table, 48” or below with an umbrella. I think it would be nice to have a small surface when working in the garden and also some shade. I just got this cute umbrella from Sunday Supply Co which I think would be so sweet with the terra cotta roof and tile patio

Turns out finding the right size table, in a style I like, that has to be wood or white because the sun will make it so hot otherwise, WITH an umbrella hole, has actually not been the easiest feat. Suggestions are welcome below.

Look at that hedge. Now that the passion fruit is in, we need to decide on what to plant along the front wall and mulch everything. My landscaper thought bay laurel would be good because it makes a great hedge and is edible (bay leaf) but 1. Who in the hell needs that much bay leaf and 2. I don’t want it to be too hedge-y and grow too tall and block light. I’ve been looking into different plants that attract pollinators and keep other veggie-eating bugs away, even if they are flowers. I’m going to run this by Eden to get her opinion and then I think we will be planting those ourselves, hopefully in the next week or so.

The area in question is about 18” wide, by 16’ long, 15’ if we assume the passion fruit will take over that corner. The edging here needs to be adjusted, clearly. I’d love the plants to come no higher than the fence on the end which is about 3 feet from the dirt. I imagine we would need about 7-10 plants to fill out the area and I’d love it to be a mix. Stay tuned.

It’s coming along folks. Slow living in its literal sense 🙂

Ok, NOW, let’s talk about Goodland! In my last blog post, I made a serious joke about considering making this front space a completely hedged-in garden with a hot tub in the middle. I still think that is an amazing idea, especially considering the luck I’ve had with hedges. However, walking out my front door in a bathing suit, hearing passerbyers on the sidewalk while trying to relax, I don’t know, seemed like a lot unless I wanted to also bring in a 6ft locking fence with hedges all the way up to my front door. That said, I have been eyeing Goodland’s wood-burning hot tubs for months and months. I even reached out to them a few months ago asking how far away the tub needed to be from my stucco house as I considered putting it on my back patio. The problem with the back patio is that we need more lounging space back there and the tub would take up way too much space. I did think about building a small deck by our bedroom window on the other side of the patio though, but quickly considered it a pipe dream because I would have to pay for the construction of the patio to put it on AND the tub. It just wasn’t in the budget for us, no matter how much my husband complained about our teeny bathtub.

So, I make this joke about Goodland sliding into my DMs and Goodland responded in the comments, my friends!! Well well well…I have about 37 projects happening around the house at the same time, should I really take on another one (financially)? Probs not. BUT HOW COULD I DENY GOODLAND??

As I’m sure you understand, but may not think of often, is that these collaborations where companies send through products, it is not “free stuff”. It is in exchange for the very real work and cost of creating content. It costs me my time, my energy, and very often (I would say in 100% of my circumstances) my money. This project, for example, I will need to pay for supplies and pay for someone to build me a platform for the tub. It’s not a DIY situation. The ground is not level and the tub is over 2400 lbs when full, so we will definitely be bringing in a professional. Construction prices are high and literally, as I’m writing this, I’m fielding questions from a company I had come out to give a quote. They just told me that teak is $47-$50 a square foot. READ THAT AGAIN. Western red cedar is $22/square foot but actually not recommended because it’s too soft. I need 75+ square feet. What am I going to do?? I asked them about Ipe, Kebony, and Thermory and I’ll report back obvi. Suggestions are also welcome here. But let’s look at the potential space, and say hello to an area of my house that I don’t think anyone has laid eyes on other than me and Andrew:

The wall to the left, the one that has our irrigation control on it, is the primary bedroom’s closet and it separates this area from the patio on the other side. Take a look at this photo from wayyyy back in 2020 for reference.

The area is back behind that pop out. Wow, my jasmine has really grown in nicely…Anyway! The good thing about this location is that it feels pretty private. It’s not even super easy for my tenants to spy on us (j/k Hope and Daniel) because the trees are in the way. The window in that area is this window in my bedroom:

photo by sara ligorria-tramp | from: moto reveal: emily bowser’s bedroom

You can also see the closet here, and as long as we’re trying to manifest product collaborations: HMU Container Store. I need a closet makeover 🙂

That’s Puck’s favorite window and the window our third cat, Gremmy, recently escaped. He’s been gone for 10 days, it’s a saga, you can catch up on my saved stories “Gremmy” if you’re one of *those* cat people. I say it here because that is why the door to go under the house is removed–we are trying to trap him under there in the middle of the night. It’s a whole thing. We also can’t begin construction on this area until we trap him. Back to this photo:

oh look! It’s the composter! yes, that is the tree from jess’ office. i’m keeping it “alive” and YES I DO OWN TO OLD TIMEY CARRIAGE WHEELS SO SUE ME

Let’s talk about the tape. I’m thinking that the platform is going to have to come out to the edge of the house (towards the irrigation controller). That’s 5 feet. That would give you space to step onto the platform, have a little wiggle room and step into the tub. The footprint of the tub is 91.5″ x 37″ x 28.5″H (with chimney 95″). So if it’s 5 feet deep, that will leave about 2 feet to step out onto. Because the ground is super uneven and because I want to avoid covering up the access under the house, the solid pink line around the house is where I think the bottom of the tiny deck should be. Yes, there is access to get under the house in 2 other areas, one in Andrew’s garage and one by the front gate/trashcans but something still feels weird about covering it up more permanently, if not only because the door is like a grate and I feel like the bottom of the house needs to breathe? Is that weird? We have a lot of issues with it getting so wet under there when it rains it just feels like I shouldn’t put the tub blocking it. The dotted line is how high up the tub will come. It’s hard to tell from this angle but the irrigation is totally fine where it is but we will move the electrical socket that is currently below and to the right of it as it would be too close to the tub. So if the deck comes to the edge of the house, even with the closet, there would be a step in front of that on the concrete. The step will go across and stop at the edge of the house on the other side, you can see two tape lines that come right up to the dirt. Because the ground is uneven, that step will start very low and get taller, if that makes sense. More importantly, where you would naturally step onto it and off of the dirt, the step will be about 8 inches off the ground and 8 inches to the patio. God, it would be helpful if I could draw. Let’s look at the tub:

Isn’t she pretty? From Goodland’s lips: “Crafted in Canada, our Wood Burning Hot Tub is made from durable, 100% recyclable materials including marine grade aluminum and western red cedar as well as oak and raw brass detailing. Thoughtfully designed with sustainability in mind, this soaking tub is suited for both saltwater and freshwater.” The chimney will be on the right side, like in this picture so it is further from our house. It should not make sparks or even smoke much if you are using it correctly. Goodland recommends being 10’ away from combustibles (grass & trees), which it will be about that far from the orange tree, which we are having to cut back a lot this month to make it safer/easier to get to the tub. Craig (Goodland) himself said 5 feet away from my stucco house should be fine. The deck will extend out to the right. But how far? We’re still figuring that out. The chimney will be 5’ away from the house. The big negative to this spot is that if we ever move we would have to take it down as we will be building too close to our fence. Funny enough, the front half of the house is only about 18” from the fence but was built before this was a rule and therefore got grandfathered in. Our bedroom was added later, (the 50s we think?) and that’s why it’s further from the fence. We will talk to our neighbors before making the final decision but based off of past conversations with them I doubt this would be an issue, especially if it’s no closer than the front part of our house. 

I know I’ll have some pushback about putting in a wood-burning tub in an area affected by drought. We wouldn’t use it as a hot tub during burn bans (although we could use it as a plunge pool!), but this is a much safer situation than having a firepit; which are totally legal in Los Angeles as long as bans are not in place. That said, I’ve become uncomfortable with them and have recently turned my fire pit into a water feature, but that’s for another post 🙂 I’m drawn to the other pluses of this tub: it’s sustainable, I can use the water for my thirsty plants, it’s chemical free and on top of all that the company is lovely and I stan their ethos: “The GOODLAND brand ethos intersects good design, human connection, and nature. We’re all about enjoying the moment and forgetting the noise. Rewarding ourselves in simple ways and seeking moments to break away from life’s hustle.” Clearly, we are still thinking this through and getting quotes, etc. This is just one option but I wanted to process it with you all.

That’s where I’ll leave you today. I have a lot of things going on over here. The next post will probably be about the back house’s outdoor space or possibly a final reveal of my back patio (that looks very different than it did two years ago in the photo up there!). Depends on what comes together first. I’m also in the trenches of a kitchen/laundry room reveal, but there’s a couple of things I’m waiting on for that. Look out for it in the next 6ish weeks. Of course, we will also be continuing updates on the urban garden. We will get a little more into the details with Eden when we do planting for the fall and finish the irrigation and plants along the edges. 

A couple of things I’m considering that I’ll take some feedback on if they are interesting to you all:

1. Revealing our his/hers garages. My side would probably turn into a post that deep dives a little into what it’s like to peek under the hood of a freelance stylist. I’m doing a massive clean-out of my side at the moment. Sara and I will be at the Rose Bowl in October (come say hi if you can!) so it would probably be after that because it is bursting at the seams right now.
2. I also truly do need to make better use of my bedroom closet, so Container Store or not, that will be happening on some level.
3. Third and final is a DIY headboard for the office. It’s always been the plan, I just haven’t gotten around to it.

You can give me your opinions below, as always I’ll see you there!

The post Bowser’s Front Yard Part 3: Building A Garden, Embracing Slow Living, And A Wood Burning Hot Tub Debate appeared first on Emily Henderson.


from Emily Henderson https://stylebyemilyhenderson.com/blog/how-to-build-a-front-yard-garden

Tuesday, 2 August 2022

The Process of Designing Our Farmhouse Kitchen – Some Questions I Asked Myself And Where I Chose “Style Over Practicality”

If you have ever stressed about your kitchen design and want to nail the coveted “practicality versus style” formula, then this post is for you (and know that you aren’t alone). In my recent book (which you should pick up if you are remodeling) I talk about asking yourself these questions before tackling a kitchen design, so I figured today I’d answer them myself. I kinda wish I had done this before, hilariously, because doing so I realized some things about us…here we go.

How Much Do You Truly Cook? And What Do You Make The Most?

photo by sara ligorria-tramp | from: #janstewary: how soup changed my life (& body)…really

This question is to basically help you figure out how high a priority different things in your kitchen should be in regards to space, storage, layout, and material choices. A big cook or a big baker requires more amenities, more easy-to-access serving pieces, more pots and pans, harder working (or very specific) surfaces, and for big entertainers, you might want full double ovens, a speed oven, and a larger 36″ fridge, for instance. If you cook once a week then you don’t need a 48″ range and don’t need to stress about how far away your pantry is from your counter. What you don’t want to happen (which still might) is to go through a kitchen renovation and realize that it’s not working for how often and what you cook. A great exercise is to go through an average week (with a partner if they are involved) and really notice what you NEED or better yet WILL USE FREQUENTLY versus what you just want. Think about how often you reached for something and where you wished something had been. Here it is for us:

  1. We make salads most days for lunch (thus the larger 30″ fridge column) full of tons of fresh produce. A lot of washing and chopping is involved. For this reason, we thought about where the sink was in relation to where I would want to chop, and how close the compost is. It’s not ironclad, I don’t HAVE to chop my veggies there but it was good to think about a day in my life and how I want to use the space. (I also don’t know where I’m going to want to be in this kitchen at different times of the day because I haven’t lived there, which is a disadvantage for sure).
  2. I cook an easy meal probably 3-4 nights a week. Usually involving a lot of chopping and stirring, then a more kid-friendly side for them. We are big seasonal grillers so we’ll likely cook on the bbq a couple of nights a week (which doesn’t exist yet because we don’t know where we’ll want to be grilling).
  3. We rarely bake (as of now). Not because it’s not wonderful to have baked goods, I’m just not good at “science” or “details”, and I’m SO MESSY/clumsy (making cookies with the kids is always a disaster), and if I’m being honest I don’t want baked goods around every day. If you are a big baker you are going to want a marble island, and well, I don’t know what else you need because I’m not a big baker :). As I write this it all feels so dumb and common sense, but it’s not I promise. You see all these kitchens in magazines and you might just say “let’s do that” but it might not be for you.

I will also say that Brian and I don’t need a super space-efficient kitchen for crazy fast meals. I actually don’t think that most families should prioritize this so much. The mountain house has the fridge off to the side (so we could have a prettier layout) and it has never once bothered us. Those layout necessities (like the triangle) are often not that big of a deal. I have put a fridge in the pantry before and it never once bothered the family. It’s literally 3 more feet, two steps, that’s it.

Do You Entertain A Lot?

photo by sara ligorria-tramp | from: all the what’s, why’s & how much’s of the portland kitchen 

Yes and No. The only time we entertain is when we have daytime outdoor casual family parties – i.e. Easter and the 4th of July. We do not have large formal dinner parties and I’m not sure we ever will. I get hosting anxiety when it comes to sit-down meals (unless you are a very, very close friend) but we have friends with kids over ALL THE TIME and I “make food” or we grill. I’m a homebody and prefer them to come to me and love nothing more than my close friends sitting at the island, sipping some wine with me while I throw together a soup. Rarely are there multiple courses. It’s more about casual gatherings with easy-to-make snacks and meals. This means we don’t need things like warming drawers, a 60″ range with different fancy tops, or a prep sink (one sink is enough). We could deprioritize that stuff in favor of other things.

If you entertain a lot you might want to be near everyone else so you don’t feel left out of the party (me!) so an open concept kitchen might suit you better. Or maybe you like quiet cooking time with a friend and want to shut off the visible mess (also me?) so no one can see. There are pros and cons to both, obviously.

Are There Often Multiple Cooks In The Kitchen?

photo by tessa neustadt | from: emily’s kitchen and dining room reveal

OMG LOOK AT THOSE BABIES!! I don’t know the answer to this! I enjoy being in the kitchen more than Brian and I cook with an apron, mocktail (or wine), and music – like it’s 1950. But he is far better at it than I am and does all the grilling or joins me. During lockdown, we would have our pod neighbor family over on Saturday nights. We took them “around the world” (Lake Arrowhead has no cuisine except “American” and pizza) so Brian and I would do 3-4 dishes from a specific country (Vietnam, Argentina, China) just to have a different flavor profile for our bored little tastebuds. It was SO MUCH FUN. We also had a lot of time on our hands on the weekends in the winter. Since then we haven’t really invited friends over to our rental house, so I’m not sure how our entertaining style will change in regards to us actually cooking real meals together. Why does this matter? Well, technically you might need more space if there are two people and you might want it to be a more open concept. You might want the stove burners more spread out, for instance, or dedicated prep space for each person. During these fun quarantined nights we realized that we wished that our island didn’t have a sink in the middle so that we had more space to spread out and not just each have 24″ on either side. Not a big deal, but again going through the motions of a week or two of your habits will help you make some decisions that only you can answer. If you have a smaller kitchen with less than 36″ clearance between counters, then stagger your major cooking areas – sink and stove so you aren’t in each other’s way the whole time. Also let me be clear, bumping bums with your partner while making homemade bolognese can also be an adorable flirty way to start a date night at home…

Do You Have Kids? Or Are you Planning On Having Kids Here?

photo by sara ligorria-tramp | from: keeping the good of last year: new family (and kid-only) activities

Ok. This involves way more follow-up questions and if you have lots of kids then these will be obvious to you, but if you don’t then this is what you need to consider:

  1. Put dedicated kid stuff low so they can reach it themselves (both food, snacks, and plates/cups).
  2. Frozen food is our friend – ample freezer space (or a garage freezer) will save you many nights. You can’t hoard fresh produce like you can frozen vegetables, so don’t deprioritize the freezer. Our freezer in Lake Arrowhead is smaller than we’d like and so for the farm, we have a 30″ wide fridge and a 24″ freezer column. If you go much bigger than that and things can get lost easily, btw.
  3. Unless you can handle a lot of maintenance or love patina (age), then really consider your island materials. Real stone is not for all of us and THAT’S OK. Quartz is great, and some porcelains are so pretty these days that even I’m fooled! Painted wood can chip, whereas stained wood will dent (which is less noticeable). You can see below what we chose and why, but don’t let that affect you – this is a strictly personal decision. Here is a post to help guide you.
  4. Think about dumb stuff like size and location of cereal box heights (allow at least 16″ on those reachable shelves), ample Tupperware storage (ooh, sexy), and again easy to access bowls, plates, and flatware. Make your life easier and put them in lower drawers, not upper cabinets.

We have two kids (almost 7 and 9!!) and that’s it, but since we both work from home (and don’t get a lot of takeout) it just feels like our kitchen gets so much use, and so much wear and tear. See below for what practical things we sacrificed in the name of style.

Will Your Island Be Used For Eating?

For us, only sometimes. This seems like a dumb question, but I see so many islands with either no overhang or only 2 counter stools at the end, opting for storage. We went through this issue when we chose our vintage furniture island (no overhang yet). But In order for people to gather around an island comfortably, you want a decent overhang (14″ at least). We are big on nightly dinners together, so no, we won’t be eating at the island because all of us facing the same way is not our preference (the people on the ends never see each other!). Brian loves to feel like he’s at a diner counter at all times so he’ll eat there for lunch (I’ll be in the sunroom) and I would imagine some breakfasts, as the kids eat much earlier than us, but not at night. Thus our cute 4-6 person homework area/family nook in the corner (really hoping that works as planned). Remember we have the sunroom as a dining room but for everyday nights this will be our eating nook.

ALSO, if four people are going to be eating at your island you likely don’t want a sink or range on it. Keep it clear for serving. Our island at the mountain house is solely for hanging out while cooking, maybe having chips and guac, but not actually dining. There are many times when someone has been sitting there and I’ve splashed them with rogue dishwater (accidentally). So if you plan on eating meals there then think about not putting a sink or stove and keeping it clear.

How Clear Do You Like Your Countertops? I.e. How Much Visual “Stuff” Can You Handle?

Very little for us. You might be surprised to know that I don’t love a lot of stuff on my counters on a day-to-day basis. We have a tray of everyday spices, a wooden bowl for onions/garlic, a basil plant, and a butter dish (we like room temp butter), but otherwise, I want it all hidden. If you are like me then consider an appliance garage (for a toaster, microwave, coffee maker, blender) or build those things into your pantry (like we are). Our kitchen in LA was so lovely, but it was on the smaller side and we had to have our coffee maker on the counter and it was just so messy every single day.

But I want art in my kitchen, pretty oils and spices, which is why we have two shelves flanking the range (which you’ll see next week). I just want them off the counter if that makes any sense. We are going to use your vertical space for those “moments”.

Where We Chose Practicality OR NOT

photo by sara ligorria-tramp | from: it’s finally here: the reveal of the mountain house kitchen

This is the biggest question that we all ANGUISH over when it comes to the kitchen. This didn’t use to be a thing – kitchens were at best utilitarian and warm, not the design center of the home. It’s like we’ve all been poisoned by seeing too many beautiful kitchens out there and now having a boring one feels like a missed opportunity. And it is if I’m being honest. But it’s such a personal decision as you are the only one using it. So we chose our stylish moments carefully, weighed the pros and cons endlessly and I hope we made the right decisions. But to be honest this kitchen might not be as practical as this mountain house. I think it’s just easier to make a more contemporary kitchen more practical than one that is designed to be more charming and old-world.

Let’s be clear, we would rarely if ever, choose an element that is ugly and practical. There are just too many great options out there that are both.

Where we chose style over practicality:

  1. Countertops – After months of indecisions (and starting with quartz), I just wanted real stone in this house. I love our quartz in our 1970s contemporary mountain house (above), but for an older, classic home we personally were willing to sacrifice some practicality for the organic pattern. We decided to only put it on the perimeter counters and we are comfortable with it aging. I hope.
  2. Vintage Island – Now, this does have a lot of functioning drawers so it’s practical in that sense (versus a freestanding table or just a shelf). The top of the table is wood and gorgeous and we didn’t want to cover it, but I am pretty concerned about how it’s going to age and what our wear and tear will do to it…and so is Brian. We are adding an overhang to it to match the wood, but does that mean our friends have to use coasters?!!!! Or will it be sealed so that it can be totally wipeable? If so, will it be shiny? The piece itself will be worth it, I KNOW IT, but I have concerns about how the top is going to age and if we will have to constantly maintain it. Maybe that’s something I’d actually like to do? Listen, if it bugs us we’ll put marble on top of it. The reason that we didn’t do that now was because there were no more slabs left (without a massive brown streak in the middle). But we can always put the honed granite on top if this wood drives us nuts.
  3. The Unlacquered Brass Faucets – We went with practical aged brass or polished nickel for the rest of the house, every other bathroom or mudroom, but for this kitchen, this gorgeous kitchen, I really really wanted patinated brass. Yes I will have to use the right soap and polish or it will tarnish and eventually have to be replaced (see this post where I demystify the unlacquered brass) but I feel confident this will be worth it.

Where we chose Practicality over Style:

  1. Cabinet Layout and Material – Not everyone agrees with this philosophy but I’d rather have stained wood that might dent than painted that might chip. We went with painted in the pantry but we are hoping that stained wood cabinetry in the kitchen won’t show the wear and tear as much. We obsessed over the cabinetry layout and functionality with Unique Kitchen & Baths so we feel very set that we have what we need (and some cute drawers mixed in :)).
  2. Lighting – We have four sources (sconces, art lights, pendants, and recessed), but the hardest one to put in stylistically were the recessed lights. They just aren’t my favorite in older homes, but we have learned like the rest of you that kitchens and baths need to be well lit simply for utility.
  3. We chose windows over upper cabinets (because we have the storage space in the pantry and the basement) and are putting electrical into the island for outlets.

So those are some of the considerations we applied to our kitchen design layout and if you are also renovating I hope these questions help you too. Stay tuned for the full design plan coming next week. xx

Opener Image Credit: Photo By Sara Ligorria-Tramp | From: It’s Finally Here: The Reveal Of The Mountain House Kitchen

The post The Process of Designing Our Farmhouse Kitchen – Some Questions I Asked Myself And Where I Chose “Style Over Practicality” appeared first on Emily Henderson.


from Emily Henderson https://stylebyemilyhenderson.com/blog/what-to-ask-yourself-when-designing-a-kitchen

Monday, 1 August 2022

How To Make Your Laundry Room Look Better (And Actually Enjoy Laundry Day)

In the next edition of our “How to Make Your _______ Better,” (see here for living room, bedroom, kitchen, dining room, shower) I thought it was time to tackle the laundry room (or closet). I have yet to live in a home with laundry in-unit post moving out of my parent’s home 17 years ago. However, I do remember not loving the visual experience. To be fair it was in our kinda scary and dark garage. Now, I also remember getting to do laundry at Emily’s old LA house while housesitting a couple of times, and let’s just say it was a TOTALLY different experience. I was excited to do laundry because it was so happy in there! And while we may not all have an Emily Henderson-level laundry room, there are some easy ways to make the whole experience prettier and more enjoyable. Let’s start with the most important step…

Deep Clean (And Get Products You Love The Smell Of)

This is a given but it’s a must if you really want that laundry area feeling fresh and new. I think almost everyone has hardened old detergent somewhere on their washing machine. For GREAT tips, go check out Carolina McCauley. This woman has a cleaning hack for everything. This is how she cleans her washing machine filter. As my father (via my grandmother) always says, “where there’s soap, there’s hope.” 🙂 As for cleaning products, sure there are some that may not have your dream scent but they work for the tough stuff. But for the everyday sprays, detergents, etc. Make sure you really love the scent. I know that sounds dumb and grabbing the most affordable or what you grew up using makes the most sense, but I PROMISE it will change the experience for the better. When I started buying this dishwashing soap, I honestly started to enjoy washing dishes more. As for laundry products, I personally love this detergent and for all-purpose sprays, I love this one and this one. Drop your favorites in the comments!

Decant

This tip is pure eye candy but makes ALL the difference. While some laundry products can’t be decanted, things like laundry detergent or pods, fabric softener, dryer balls, dryer sheets, etc can and will make your laundry space look less cluttered. Might as well have the items you use most easily accessible and looking pretty. This is also a great opportunity to go to your local sustainable zero-waste refill shop if you have one in your area! That way you can bring in your own container and you’re all set. Decanting also helps you to know when you need a refill as opposed to finding out the moment you really need to wash those jeans ASAP.

Here are some of my favorite options:

1. Half Gallon Glass Pump Dispenser Bottle | 2. Glass Storage Canister with Wood Lid | 3. Glass Vintage Beverage Dispenser | 4. Marie Kondo Large Modular Glass Canister Ink Black Lid | 5. Empty Laundry Liquid Dispenser Set | 6. Extra-Large Glass Canister

Shelves

Use that wall space! Let this be the push you need to finally just put up a few shelves (especially if you have one or two top loading machines). It’s an easy way to add storage and style. Look at the two laundry spaces below! On the left, you have Velinda’s laundry corner just off of her kitchen. The light wood shelves with the white brackets add a warm modern touch to a mostly white space. And since this area is next to her kitchen they provide useful and pretty storage. Then on the right is Emily’s old Glendale laundry closet. Look at how pretty and sleek that slim white metal shelf is?! It perfectly adds to the wallpaper without competing. Plus the double level for maximum storage space.

BONUS TIP: Get yourself a little trash bin for lent like Em did. Makes life a lot easier in the moment:)

These are a few great options for shelves:

1. Wood Wall Shelf with Reversed L Bracket | 2. Walnut Brown Wood 4 Tier Floating Wall Shelf | 3. Over the Washer Storage Shelf | 4. 3-Tiered Floating Lines Metal Wall Shelf | 5. Rattan Wall Bath Shelf | 6. No Stud Floating Shelf

Baskets

I would be remiss if I didn’t remind you all about the power of “the basket”. Let this not be confused with the larger laundry basket. Maybe you don’t want to decant. Maybe you have laundry tools you want to not have to look at every day but don’t have any closed storage. That’s when a cute bin or basket will be your best friend. See how cute the ones from the Portland Project look?

photo by sara ligorria-tramp | from: how we designed a family-friendly laundry room in the portland project

My personal favorites:

1. Small Natural Wood Handles Milk Crate | 2. Natural Hyacinth Piper Utility Basket | 3. White Ash Basket | 4. Paulownia Wood Potato Bin | 5. Dark Blue Metal Stacking Storage Bin | 6. Marie Kondo Ink Black Shoji Bamboo Bin With Liner

Drying Rack Or Bar

If you don’t have either a drying rack or bar may I HIGHLY recommend you fix this immediately. I remember the days before my drying rack, with clothes hanging all over my bathroom and bedroom and boy did it bum me out. Plus air drying your clothes will make them last longer! There are a few different options – a wall rack that folds into itself when not in use, a collapsable rack for the floor that you can tuck in a closet or in-between your washer and dryer, and lastly a bar. The bar is in my dream laundry room so if you have the space I highly recommend this one! It will get you the most space for your clothes (plus you can get pretty hangers like these). Of course, if you have a yard and generally have good weather where you live, hanging them on a clothesline outside will really give you space and you can dry everything!

photo by sara ligorria-tramp | from: how we designed a family-friendly laundry room in the portland project

These are the ones I would pick:

1. Bridgeport Modular Add-On Folding Drying Rack | 2. Wall / Ceiling Mounted Clothes Drying Rack | 3. Gabrielle Organizer Wood Drying Rack | 4. The Beadboard Drying Rack | 5. Accordion Drying Rack | 6. Rubber Wood and Stainless Steel Drying Rack | 7. Over-The-Door Drying Rack | 8. Greenway Folding Drying Rack | 9. Small Folding Wall-Mount Drying Rack

Hampers

Hampers are kinda essential in the laundry game. If you have an actual laundry room and/or live in a single-level home, hampers with wheels are the way to go! Being able to roll and not lug feels like the ultimate luxury. Hampers are also another easy way to up the style in your space. We have also been a fan of the Steele canvas laundry baskets you see in the Portland Project but we have some other options (both with and without wheels) for you to check out:

1. Uashmama Modular Snap & Separate Laundry Bag | 2. Bamboo Eco Storage 3 Bag Laundry Sorter | 3. Steele 3 Bushel Canvas Laundry Bin | 4. Steele 2.5-Bushel Olive Vertical Rolling Laundry Hamper | 5. Wire Rolling Laundry Hamper | 6. Rounded Weave Basket

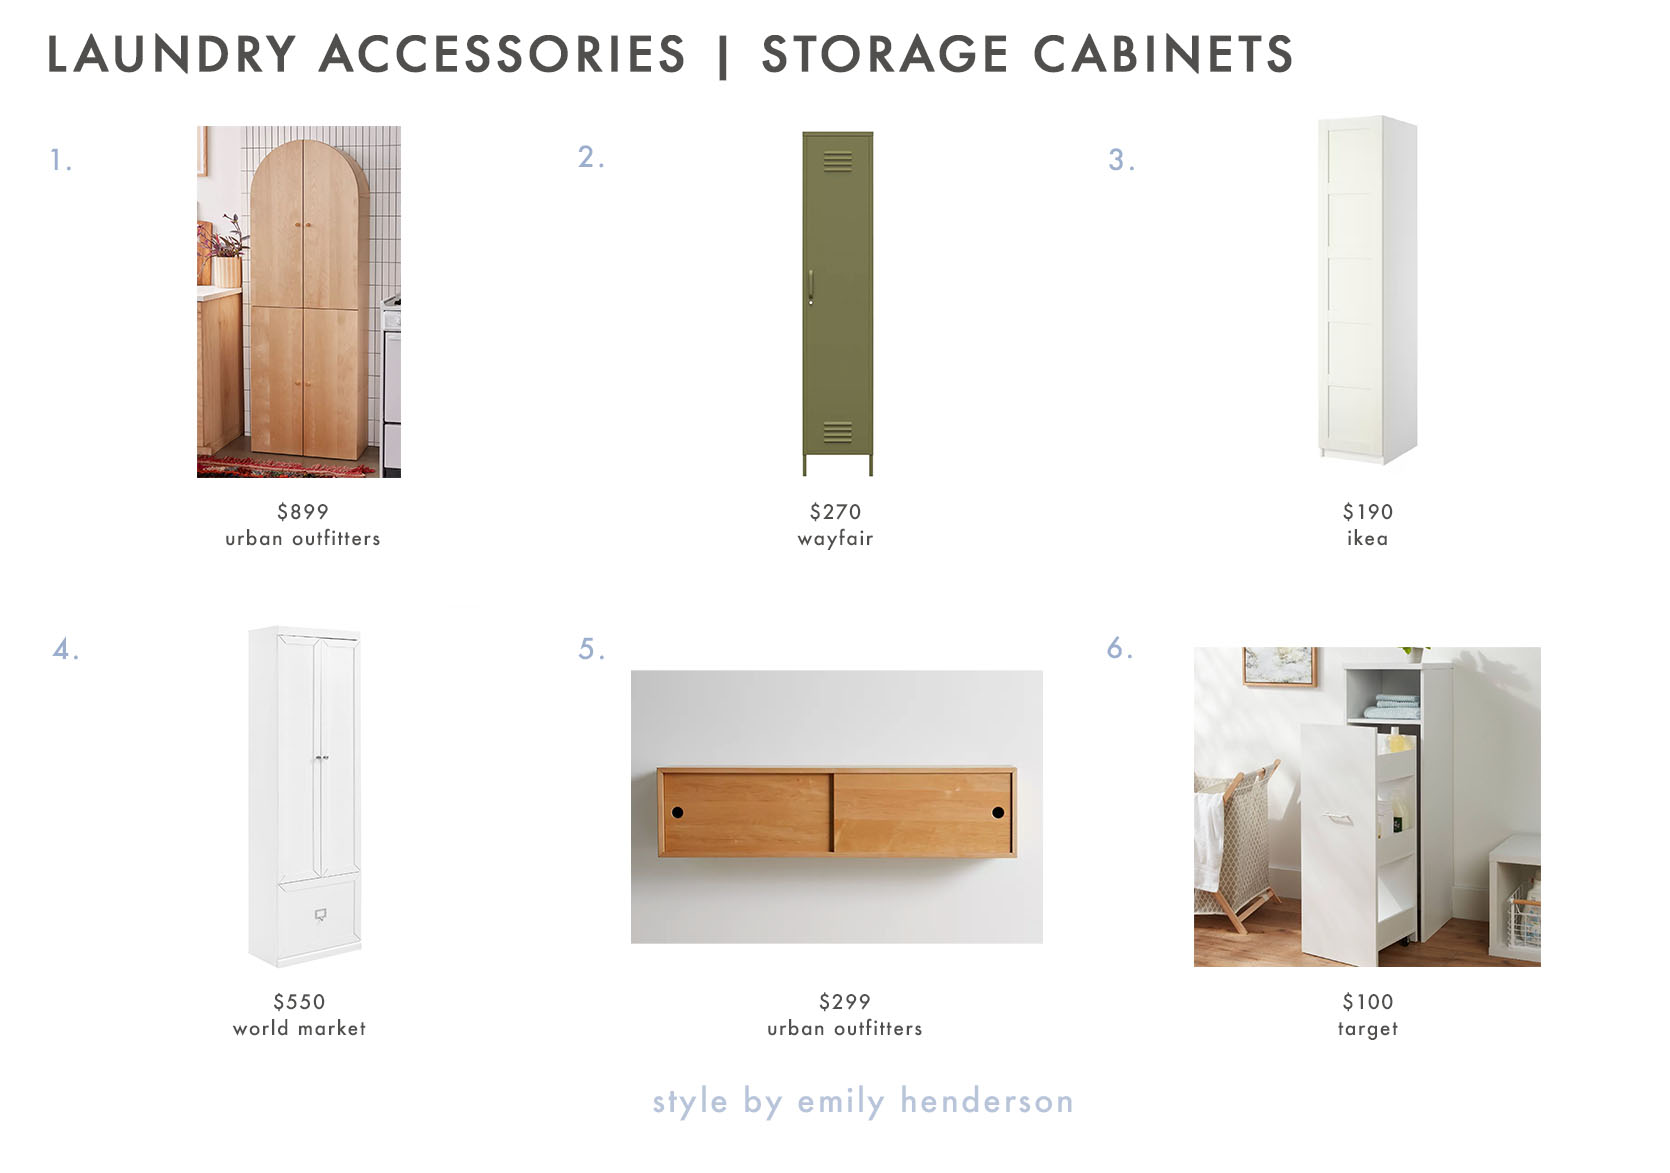
Storage Cabinet (Mostly Standing Ones)

If you have the space may I suggest a storage cabinet? It’s so nice to have both open and closed storage to hide away clutter and just have more places to put things away properly. And not only is it great for laundry products but you can use it for daily household cleaning supplies (even a vacuum if it’s the right kind!).

These have my vote:

1. Mason Pantry Cabinet | 2. Shelf Storage Cabinet | 3. PAX | 4. White Wood Convertible Armelle Kitchen Pantry Cabinet | 5. Gillian Sliding Door Wall Shelf | 6. Narrow Storage Cabinet with Pull Out Cart

Tray

Remember when I talked about decanting things like laundry detergent? Well, if you really want to make it look like a designer/stylist came into your home, get a tray. After the tray is purchased, arranged your decanted products on top, and voila, a perfectly styled laundry room! They will instantly elevate the space, I promise. Just make sure they are easily wipable as it’s inevitable that some deterrent will get all over the tray:)

photo by tessa neustadt | from: how our new laundry room came together

Check these cuties out:

1. Hilo Lava Stone and Resin Tray | 2. Decorative Marble Rectangle Tray | 3. Oslo Wood Tray | 4. Beveled Metal Decor Tray | 5. Acacia Wood Adirondack Tray | 6. Cast Metal Round Tray

Art

Ahhh the power of art does not exclude the laundry space! Look at Allison Pierce’s home below. Those four pieces of art (minus the plates) really make this room unique and look alive. I wish I could do laundry in there too! I also think choosing playful art for laundry rooms and bathrooms is the only way to go. Show your personality and choose art you love looking at.

photo by sara ligorria-tramp | from: working with what you’ve got – an $8k budget kitchen makeover with a lot of vintage charm

These pieces spoke to me but if they don’t do it for you check out the sites they come from. I bet they will have something that’s perfect for you!

1. Cotton Candy Leftovers by Cathy Sunu | 2. Shapes and Lines Framed Wall Arts (Set of 2) | 3. Minimalist Fine Art Print | 4. “Good Things Are Coming” Digital Print | 5. Summit | 6. New Day by Alisa Galitsyna

Extra Credit: Wallpaper And/Or Paint

If you want to add a little extra elbow crease, paint and/or wallpaper your laundry area. As you can see in the photo above and Em’s old wave wallpaper it can really make everything come to life. Plus since it’s usually a smaller room those things will be a little more affordable since you won’t need a lot. Win-win.

Is your laundry room better yet? Just kidding. But truly I hope these were helpful and good reminders that any room in your home can be made better. Any other tips from you? Let us know in the comments.

Love you, mean it.

Opening Image Credit: Photo by Tessa Neustadt | From: Laundry Closet Makeover

The post How To Make Your Laundry Room Look Better (And Actually Enjoy Laundry Day) appeared first on Emily Henderson.


from Emily Henderson https://stylebyemilyhenderson.com/blog/how-to-make-your-laundry-room-look-better

Our Back Patio Reveal! (+ How Everything’s Held Up To 6 Months Of Portland Weather)

The light at the end of the construction tunnel is getting bigger and brighter every day – we are hoping to be fully blinded by June. So i...