
As you saw last week, the first floor needs a lot of reconfiguration which means we have to really invest down there – not only in framing, plumbing, electrical, windows/doors but in all the finishes. So when we looked at our “budget” we said let’s splurge on the downstairs and save on the upstairs. No offense to our children and future guests, but we are absolutely prioritizing our new bedroom suite over their bedrooms  Listen, they’ll be fine – Brian wants to get alpacas and they’ll have a sports court for goodness sake. So here we go.

Let’s go on a video tour of the WHOLE HOUSE, shall we? (Just let the ad in the beginning play through:))
THE LANDING AND STAIRS


When you walk into the house you immediately turn and see the stairway to the second floor. It is surprisingly grand and beautiful. I was corrected in the comments last week by many of you who said that older homes of this age actually did typically have taller ceilings – whoops – so I was wrong about that, but I guess the older homes I’ve been in have felt more sweet and cramped (and I know your Europeans are laughing when I say ‘older’). This stairway is so wide and grand and the rooms are just so roomy – I LOVE it. My brother, a true bull in a china shop, won’t stop talking about the width of the stairway. He can do so little damage in there.
As I mentioned before we are likely keeping that pretty original window (this one we might not have to restore, crossing fingers). We are almost positive that underneath the carpet is wood flooring and if so we are going to rip out the carpet and then assuming the wood is in good condition, paint the flooring. Then we’ll add a pretty stair runner (with a brass rod) to make it cozier and warmer (and help with sound).
Most of the trim work – the stair molding, handrails, and that tiny little closet will be kept and just painted. I originally considered redesigning the stair railing because I’ve grown to love them as an unexpectedly pretty feature but I’ve since changed my mind.
THE LANDING


How sweet is this little landing? It’s big enough even for a homework area (maybe that’s where the computers go when they are older?) and really connects the rooms in a friendly way. We love the doors and will likely refinish and paint them. The flooring will get a fun painted pattern and maybe we’ll put in a skylight to bring in more light. It already has that pretty window so maybe we don’t even need a skylight. It doesn’t feel that different than our LA home in the sense that all the bedrooms are close to each other and share a landing, which just creates a good feeling.
Challenge #1 and a Splurge – Can We Add a Laundry Closet?
One of the only things I wanted to do up here on the ‘luxury’ side was to add a laundry closet to the landing. Having laundry on your bedroom floor (if you can) is so nice in a million ways (avoid that schlep). Since COVID, our kids have to do their own laundry (fold and put away), and having their own (not mixed with ours) is going to make it that much easier (with less excuses). Hot tip that every parent knew but me – if you tell them that they have to wash, fold and put away all their own clothes, guess what happens? They produce way less dirty laundry. I overheard Birdie asking Charlie, “Do these jammies stink? Mama said if it doesn’t stink it’s still clean’. It might sound gross to you, but it’s a pretty darn proud moment as a parent to get them to think about conserving work, time, water, and wearing things multiple times if they aren’t dirty or ‘stink’, as she put it. We do laundry and deep clean the house on Sundays and they get a sundae when it’s all done – sundaes on Sundays is a very fun tradition. Even if/when we have help cleaning our house again by a service, these kids will do their own laundry. So yes, I want them to be able to have their own washer and dryer upstairs so I never have to do their laundry. But where can it go? I figured it would be in the landing like where the linen closet is but Anne (Arciform) has a better idea – stay tuned!
THE BEDROOMS


These bedrooms are GREAT. The bones are just so good and not one feels compromised. All three are corner bedrooms which means they each have 2 walls of good light (3-4 windows each). They have tall ceilings and are pretty spacious (225 square feet). For now, the kids want to still share a room. I think going from sharing a king bed here, to moving states, moving homes, moving rooms, being in separate beds (it’s time) and then being on a different floor from their parents is going to be a lot of change (not to mention new school, new friends, new weather). So we are thinking one bedroom for them to sleep in one bedroom as a playroom til they are ready to separate, and the third will be a guest room. They are best friends and if they want to share a room til they are 9 and 11, that’s fine by us (10-12 yrs old is usually when the older one wants autonomy + the whole puberty thing… ).


THE BIGGEST CHANGES TO ALL THREE BEDROOMS:
- Wall to wall carpeting – We are likely going to keep the original wood flooring underneath and just put in wall to wall carpeting to make it feel super cozy. We LOVE our carpeting up here (with the 1/2″ memory foam underneath) and are in search of a different (still subtle) texture or pattern for these three rooms. I’ll probably do all three different – but design them with flexibility because I don’t know who is going to end up where over the next couple of decades.
- Bigger closets – These kids don’t need walk-ins (nor is there room) but right now the original closets are pretty small so we are hoping to expand them to be larger reach-ins. The kids have also requested a secret door through the closet from one room to the other, and as a lover of all things whimsical I will be searching for a wardrobe to build into the wall to please all our ‘lion, which and wardrobe’ fantasies.
- Better lighting/electrical – right now the only light source is these pull chain sconces (no overhead lighting and no light switches). So we are definitely putting in overhead lighting (likely just a centered fixture, no recessed) and what I’m seriously debating are sconces. I said over and over in my book about the benefits of having multiple light sources, however when you don’t know how you are going to layout a room long-term it makes it hard to play junction boxes. for instance, I didn’t know that a lot of kids like their beds to be in the corner – thus freeing up space, but also making it feel cozier. If that’s the case then our symmetrical junction boxes for sconces or pendants flanking the bed would become awkward without the bed. So it’s a funny balance of not wanting to miss an opportunity now, setting ourselves up for long term lighting success, but at the same time not actually creating a problem we have to then solve (like awkwardly placed sconces). I’m working on the solution, so stay tuned. We will also update all the outlets (and add way more) and think about future computer/tv usage (OR NOT and just put those in the landing – maybe no wifi at all in their rooms????? Is that legal????). I’m even considering ceiling fans to cut down on AC up here in the summer. You heard me – there are a lot of pretty ones out there and I LOVE the ones from Rejuvenation.
- Restore all the windows (and make them safe) – As you can see the original windows are super low, like a MM thick and not tempered. They are grandfathered in so technically we don’t have to raise them to a safer height. We have to remove them, double glaze them (strip them), and repair the sashes. Also, we need to make them operable without my kids falling out. So we might add little iron safety rails outside (this is what we did in LA) but if anyone knows of a better solution let me know. I haven’t asked our build team yet … ****(BTW if you are in Portland and want to update your vintage windows but aren’t renovating my sister and brother-in-law own Veridian which comes to your house and does this on-site, window by window – It’s GENIUS. Also funnily enough, my Father in law does the same thing in Sacramento (inspired by my BIL). It’s a special patented tool that very few companies have and is wildly more convenient than not having your windows for weeks during the winter – look them up!).
- Replace/update all the trim work and add any special paneling – Since we have to open up walls and ceiling and rip out the carpeting we have an opportunity to rethink all the casings and trim work. While I love the original doors (and they are staying), I have a different vision for all the moulding and casings. Stay tuned.
- What to do with the walls? – At first, I wanted to put this tiny 1 1/2″ vertical beadboard that is original to the victorian house (think crazy tight, thin vertical paneling) but I’m worried it doesn’t give us enough flexibility. Elliot has already requested and made me promise that she can have a LOT of color in her room (her favorite color is “all the colors in the rainbow”). She followed that request up with “because, Mama, there is NO color in this house except brown and white”. AHEM YOUNG LADY. She’s not right – we have blues and some greens, but point taken. I’m not in the business of creatively stifling my children so I’m leaning towards just drywall with paneling on the ceiling so if/when we want to paint/repaint, do a mural or wallpaper we have flexibility. I showed her Violet’s bedroom last week and she SCREAMED again and said, ‘Mama, Mama can I please just have that room – I WANT PINK AND PURPLE EVERYWHERE!!’. So I’m pretty sure my ‘quiet mauve’ original vision might get usurped by some serious color and pattern and that’s fine by me


THE HALL BATHROOM

This house is 2 bathrooms now, but we’ll make it 2 1/2 which doesn’t sound like a lot, but I actually think is totally fine. The kids and any guests will share this bathroom as there isn’t room to really put another one in here nor do I think they need it. This is the room that if we weren’t renovating we’d likely just update a bit – it’s pretty cute! It was renovated in the ’80s and I know that a lot of you responded to the tile. Here is our rough plan or at least our first thoughts:


- The layout – We’ll leave all plumbing where it is – saving money on trying to relocate and since it was redone a few decades ago (can you believe the ’80s was 40 years ago??) likely nothing in the wall needs to be updated.
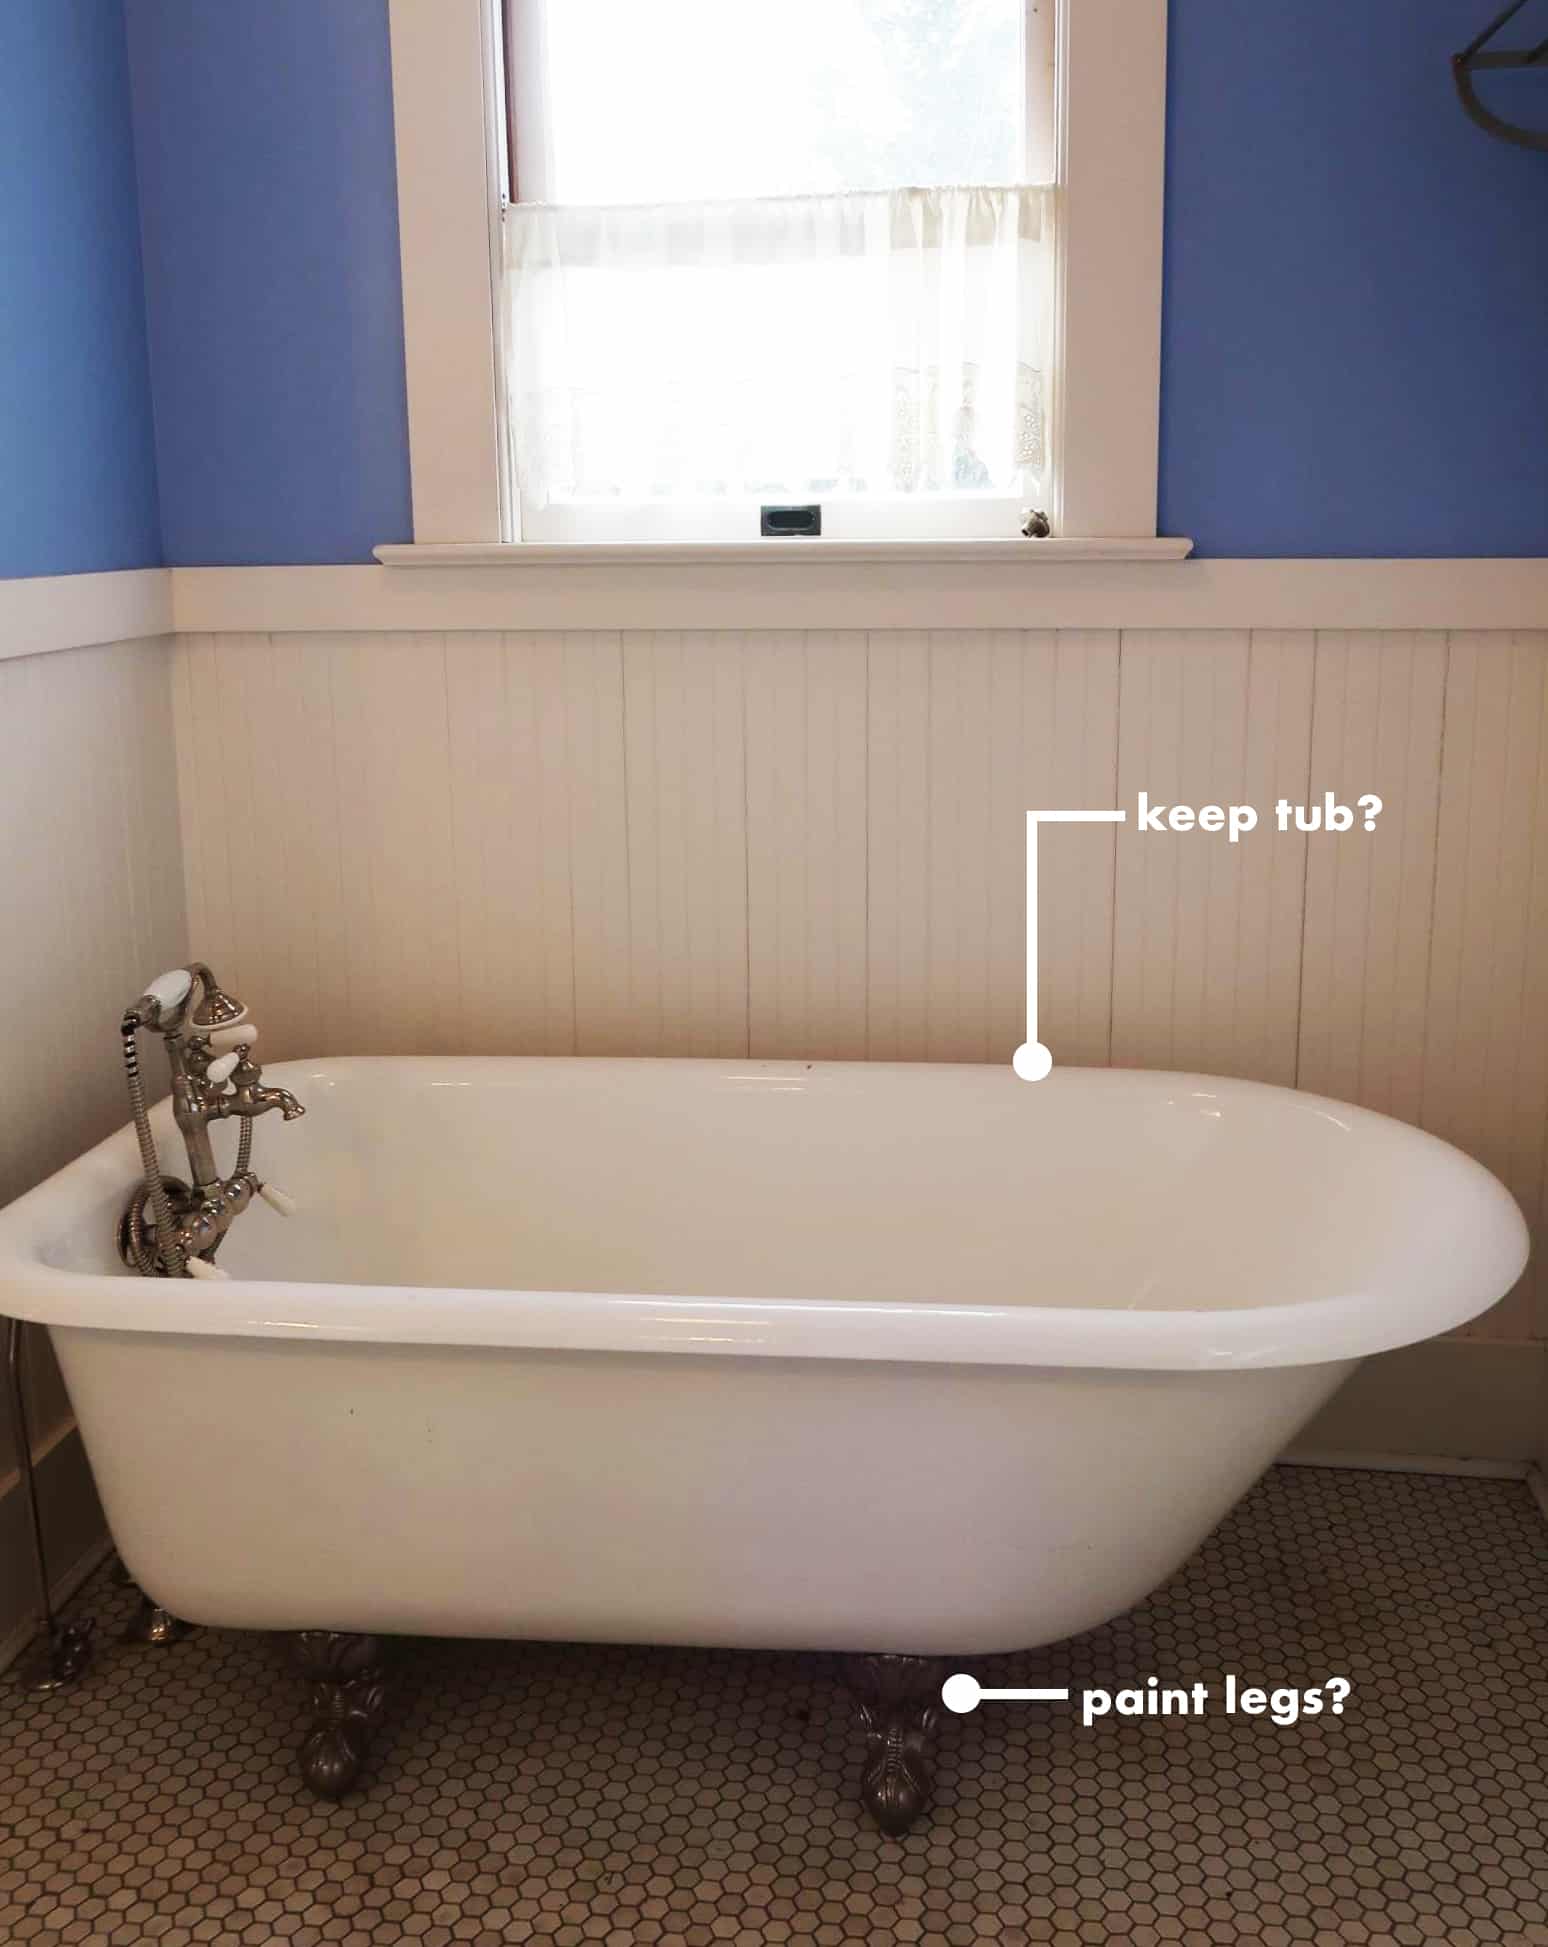
- The clawfoot tub, but maybe paint the feet. It’s so cute!
- The Shower – We’ll make the current shower ‘room’ better by bringing it to the ceiling, redoing the finishes, and adding a door. Since it’s a shared bathroom we thought that the privacy of an enclosed shower would be nice (plus I think it will be super cute in a vintage way when we are done with it).
- The toilet and pedestal are both in decent condition, but this room will likely get a lot of use with two kids so we are planning on moving the original toilet and putting it in the victorian home (which is toilet-less right now), and relocating the pedestal to the new powder room, and replacing with something with more storage.
- The floor tile – This tile is from the ’80s and while it’s actually pretty cute in photos, up close the design/build team has said it’s not necessarily well done and not in the best condition (it’s 40 years old). So while we could live with it, absolutely, everyone agrees to replace it with something that will feel fresher, more high quality and more in line with the art direction of the whole home – coming soon). Do me a favor and wait to post your tile rage until we are done, and if you don’t think I’ve done this vintage bathroom justice, please let me know
- The paneling – While this beadboard is sweet, a floor to ceiling subtle handmade brick tile is sweeter and will be such a great backdrop to the tub and vintage windows (not to mention last forever and be really water-resistant).
- The lighting – We’ll update the placement and style of the lighting to be classic (but maybe with some whimsy or youthfulness since it’s for the kids). The only thing I want to explore when we are up there in a couple weeks is the medicine cabinet – remember this post? Well, surely there is something we can do to keep the function but make it feel special.
As I stated at the beginning – it’s become clear that doing what we want to the downstairs will be a pretty penny, so for every decision upstairs we are asking ourselves ‘Do we really need to do this? If so, how can we save money?‘. While we have to open up the walls and ceiling in the bedrooms to update the electrical and HVAC we are limiting the luxuries and anything that doesn’t need to happen. Quite literally every move you make costs money – even slightly reframing a closet can set off a domino effect where you then have to account for the trim work, the flooring underneath, etc. So we are being pretty conservative up here which feels really, really good. Less design time, less construction, less finishes to decide on – just make it safe and functional (and fine, beautiful) and don’t overthink it. This is a problem of mine and I’m often grateful for it where I benefit (like our bathroom up here which is a DREAM to be in) but these rooms are nice, spacious, have great light, and some sweet details – they don’t need to be totally re-invented.
Coming up next – the *final* floorplans, and I think we all know it won’t be final… but we are getting super super close and we are SO EXCITED. If you see any major red flags I’m missing up here, let me know
The post Our Farmhouse – The Upstairs Tour + What We are Keeping and Changing appeared first on Emily Henderson.
from Emily Henderson https://stylebyemilyhenderson.com/blog/our-farmhouse-the-upstairs-tour-what-we-are-keeping-and-changing


No comments:
Post a Comment