

HI EVERYONE!! It’s been a minute. I am so excited to talk to you about this random room that has taken me So. Dang. Long. to figure out. We are going to talk about its evolution from Psycho Parkway to The Bad Boi Room to The Foster Room to Andrew’s Dungeon to my Recovery Space to its present, multipurpose, hardworking, 100 square foot room everyone (including the cats) want to be in 24/7.
Let’s start at square one, the day we closed on the house:


And now you know why we called it Psycho Parkway.
The footprint of this room has remained pretty much the same. We removed the closet, seen here on the left, in order to make space for a bed in the primary bedroom (my headboard is on the other side of this wall). We also lowered the left window to even them out and replaced them. Other than the living room, this was the only other room with original wood floors and as you can see, not in the best condition (Water damage! Termites! Woohoo!). The drywall had to be removed throughout the house in order to replace all the electrical and install AC/heat.


If you haven’t read the financially insane saga of buying this house, you can read it here. The short story is that we were almost completely financially ruined by the “end” of the reno (is it ever really over?). The point is, by the time we were living in the house, we didn’t have ANY money to do, well, anything. Before living here we actually have lived in bigger apartments (square footage wise) but never in a 2 bedroom. We simply didn’t have anything to put in this space. I couldn’t even find a picture of it finished because what ended up happening is, they fixed the floors, closed up the walls, painted them the same color as the rest of the house (Polar Bear by Bher) and we shoved a dresser we owned previously that didn’t fit anywhere else and everything that we didn’t want our cat Puck to get into. This is when the room was dubbed “The Bad Boi Room”. Puck is our difficult baby that we love dearly. He has a lot of…quirks? He’s gotten a bit better with age, but when we moved here he was still pretty young and if he can find even the tiniest piece of plastic, he will eat it, vomit and then pee in/on it. Also he generally will treat anything he can get inside of like a litter box (ask my friend Ashlee who had her suitcase used as one). ALSO any pile of things. Vague, I know. But if it resembles a pile, he would pee on it (ask my friend Jenna, her jacket was tossed on a chair and sort of was like a pile?)
They are super fun quirks and only a mother could love him. Truly. Good thing when you move to a new place and nothing can go into your garage that’s flooding, you definitely don’t have any plastic or boxes or piles. You also have a TON of patience when said garage is flooding and you owe your contractor $80,000 and have zero dollars. It was also November of 2016. It was a dark timeline.
So, this room became the room we were able to put sh%t in and shut the door – which of course made Puck all the more obsessed with it and he would sneak in whenever possible, all he wanted to do was go in there and be BAD. This lasted…a year? I don’t know, time is weird. Eventually we were able to get one of those pull out couch situations from IKEA and it was a pretty sad, but completely fine guest room. And by guest room, I mean cat room. Cats were the main guests. In fact, we were fostering the best cat in the world in February of 2019 when we used the space (because it was basically an empty room) to shoot a removable wallpaper project for Target.

(Sherman pictured in window. He was “the one who got away”. Not literally. He’s happy in a home, just not mine, which is sad, for me.)
This wallpaper isn’t exactly my personal style vibe, but shooting in this space made me realize a few things: 1. The more stuff that was in the space, the bigger it somehow felt. I don’t know if I mean literally bigger, but I was surprised by how much could fit in there which made it FEEL bigger, if that makes sense (?). It definitely felt cozier and more welcoming. I wanted to be in it. 2. I really liked that high shelf moment and wanted to incorporate that into my design. 3. I wanted the walls to make a statement like this wallpaper.
About a month after the shoot, my husband went freelance and needed a proper office. I had our friend Shade paint the room Laurel Woods by Sherwin Williams which is an INTENSELY dark green. I didn’t know it at the time but it’s also the color of the exterior of the Mountain House. I went. for. it. I had him paint the trim, the inside of the door and the ceiling. My dream was to turn this into a guest room/office/workout space/TV room and it was all in my head. I wanted it DARK for lots of reasons, Andrew likes it dark when he edits videos (he’s not an editor but has to do edit passes regularly), for TV watching, and also I prefer a dark room when I work out (cardio specifically because it makes me zone in).
We had to trash the IKEA couch. During the wallpaper shoot it rained, no, it POURED – and my trusty-most-floodingest garage (where we were storing the couch) did its thing and flooded, like, A LOT. On the bright side, this made us have to make some decisions about furnishing the space fast, which isn’t really my MO. I had a vision of this custom wrap around desk that incorporated a bed which we did DIY but then, crickets. 2019 was CRAZY. We produced SO much at EHD AND I finally pulled together my primary bedroom, bathroom, living room, and dining room for reveals. THEN in November, I left EHD to work on Orlando’s HGTV show, Build Me Up, and worked on that literally into the beginning of the pandemic. “THE SHOW MUST GO ON, no, literally it must – we can’t just leave these people without houses!” Cut to me, maskless, going into every store as the world was shutting down. “GET OUT OF MY WAY I NEED THROW PILLOWS.” Ironically, by the time I was in quarantine, we didn’t have any toilet paper. Why I couldn’t navigate my 2 carts full of tchotchkes to the toilet paper aisle? I’ll never know.
Suffice to say, the office was pretty low on my priorities. I felt like I was barely home the entire year. Like, I know I slept there just about every night but it really didn’t feel like it. Andrew, however, was home ALL the time and if there’s one thing I’ve learned by being with Andrew since the summer of 2000 (yes, you read that correctly) – Andrew should never, ever, be left to his own devices. No, seriously, forget the before from before and BRACE YOURSELVES.

Y’alllllllllll. This is what happens if you let Andrew loose. He brought WFH to a whole new level. I mean, you could spend a long time finding all the gems in this photo, but my favorites include: 1. the robe being used as a window treatment on the left 2. the monster hands on the ground, and 3. the Elvira pin up on the wall. He never turned off that bat light or the red light so when you got up to pee in the middle of the night (the bathroom is directly across the hall) whatever that thing is that’s wearing a fez would stare at you while you were relieving yourself. TERRIFYING. He is constantly creating so that room was pretty much always in a state of chaos even though I made him “pick up” regularly. But I mean, if you can imagine this picked up, it’s still WILD.
Rewind for just a sec…another fun thing that happened in 2019 (riiiiiight as I was starting the show) was that I found out I had fibroids. Not your run of the mill fibroids (not sure what that means) but a fruit basket of fibroids. Well, I liked to call them that because doctors LOVE describing sizes as fruit like we’ve never heard of a centimeter before  . I had a grapefruit, an orange, a lemon, a kiwi, and a grape. Cute right? (Shoutout to Arlyn for making me go to the doctor!). If you aren’t aware, uterine fibroids are noncancerous growths in or on your uterus. Not much is known about why they occur and I won’t get into it because honestly, this isn’t my field and this post is already long enough, but let’s just say gender and race factors around this particular health condition are very much so WHY we don’t know much. Unfortunately, I was one of the women where a myomectomy was my only option. But fortunately, I was able to pull together enough money to pay for my health insurance out of pocket (as I was now freelance). The doctor was all, “Damn. How’d you NOT know about these? They should come out PRONTO” and I was all “Uh. No. Gotta work. V poor. Paying for insurance out of pocket, bought a house, it’s a long story…ALSO DOCTOR HAVE YOU SEEN I DIDN’T KNOW I WAS PREGNANT???? DON’T @ ME”. And then the pandemic started right before I was supposed to take them out (April) which kinda threw a wrench in things.
I digress. The reason I’m telling you this really personal information is that knowing I had a major surgery coming up as soon as hospitals weren’t completely overrun made me pull the space together a bit more. A myomectomy has an 8 week ~mostly~ bedridden recovery. You are supposed to move around a little bit after a couple of weeks but you have to be crazy careful. It’s like having a c-section but “worse” (according to the doctor) because you have the incision, plus all the other internal incisions. Ugh. I wish it was socially acceptable to post pics of them, you KNOW I made the doctor take pics. Ok, now I’m sharing TMI just for funsies. I wanted my TV room dream for my recovery where I could watch every documentary on NXIVM and Scientology, take edibles, watch everything vampire (missed the bus a decade ago) and fill my glorious museum on Animal Crossing.
Spoiler Alert: I did all those things
In a stroke of luck, our former tenants moved out in August and the newbies that moved in didn’t want/need their side of the garage. The words were barely out of their mouths before I started moving Andrew’s office down there.

Daffy and I simply cleaned up the space and moved in…

At first, it was nothing crazy. Daffy and I made the bed, Daffy and I patched the walls (the monster had used gaff tape to hang things, you can guess how that turned out), and Daffy and I bought this handy dandy bolster off of Etsy. I bought the king size in “Toast”. (Pro Tip: the length of a full mattress is the same as the width of a king bed) and – voila! Take it off for guests to sleep at night and during the day…wait is that why it’s called a daybed? It actually makes a HUGE difference in the comfort level of using a bed like a couch. Highly recommended. Really, and I #paidforthis.
During Amazon’s Prime day in mid-October, I finally bought myself a Samsung Frame and we had it installed right in time for my surgery in mid-November (I was very lucky to get in right before the holiday Covid surge). The rest of the room stayed as is and I got to spend a lot of time dreaming up what I wanted to do to the place.


Let’s get to some reveals already!

OK – so there’s a lot going on in this room so I’ll break it up and go through my favorite parts.
The Wrap Around Desk/Shelf/Bed

Rug (vintage) | Chair (vintage | Woven Basket | Wall Color
I wanted something that made the most of the small amount of space in this room. It’s a simple construction, doesn’t really warrant a tutorial because it would vary based on the space you have. I used the cheapest wood I could get at Lowe’s (I think it’s pine?), a lot of Matte Black Stain, quite a few L brackets (big ones to hold the desk to the wall and smaller ones to attach the sides and shelves) and some 2x4s to help secure the desk to the wall. I could have bypassed this and just gone for more L brackets but I liked the idea of being able to attach the whole back piece all the way around. In retrospect, not sure if I would do the 2x4s again. It’s definitely secure but maybe overkill? I was making this up as I went so I think there’s better and more refined ways to do this for sure. I decided to make the desk 18” deep (two 9” wide pieces of wood connected to each other) on the right side. The part that wraps around (under the windows) is just one 12” wide piece of wood. The right side ends so there’s about a foot of breathing room for the door to open all the way, which is even with the end of the bed, making the desk/shelf/bed sitch an imperfectly perfect U shape with the area rug (HELLO JEAN PALMER HOME), my $50 vintage chair (that is in desperate need of an upholstery job – recs?), and my “Trashcan” sitting in the center of the U.


Table Lamp | Diffuser | Vase | Wooden Tray | Lidded Dish | Knot/Checkered Tray | Stapler | Ladder (Vintage)
I put shelves on the right side of the desk (by the door). The top shelf holds the box for the Frame TV, the two other shelves have vintage Hearth and Hand faux leather bins (no longer available) with workout gear in the top one, and our Peloton shoes in the bottom. On the desk, I keep my favorite lamp ever by Human Home. It gives off good diffused light for this dark space and has a built-in dimmer (a must for me). My Terracotta Vitruvi Stone Diffuser is among my favorite purchases for my recovery time. The Grove scent is my personal favorite. (reminder: I #paidforallllllthis) Because of the very limited storage, I keep office supplies in creative spaces. We always say this at EHD, but a good tray is hard to find and this Rounded Wood Tray by West Elm is gooood. It’s a great size, has handles, and the rounded edges gives it that detail that makes it not too basic. Love this Studio Mcgee for Target vase, I use it in practically every shoot I do because it’s neutral, versatile (is it a vase or the perfect crock?), and luckily for you, still available. The Trinket Dish I pulled from my prop collection and it lives here now because it’s so cute while holding receipts that need to be scanned (a regular part of my life). That checkered tray holding my tape dispenser, stapler, and vintage ruler is none other than Tramp Ceramics, as is the knot on the wall hanging above it!


Natural Woven Box | Cement Head
The “shelf” that wraps under the windows is the perfect side table for the Daybed as well as where I keep my box of small office supplies (extra pens, pencils, erasers, clips, washi tape, etc), my mancala board, and a cement head (obvs). The smokey globe light is IKEA. I’ve had it forever and it’s lived just about everywhere in my house which is good since it’s just a placeholder for a vintage lamp I have coming.

The bedframe is the cheapest wood IKEA frame, with stained wood pieces screwed in around the side and bottom, making it look continuous with the desk. It *may* be the Neiden but it didn’t have a headboard at all so I’m not sure? There’s a shelf on the side that is even with the bedframe (so slightly lower than the mattress). I have a stack of our favorite games and puzzles, along with 2 of my favorite Target coiled rope bins. In one I keep extra bedding and the other is a catch-all for things I use on the reg. But when not in use I want them out of sight/mind eg: laptop, iPad, journal, a pouch with misc chargers, and the current book I’m reading (Zen and the Art of Motorcycle Maintenance if you were wondering). In the back corner of the shelf and on The Citizenry side table on the other side, I have 2 power strips that are running from a plug that is directly in the middle of the bed, behind the bolster and impossible to get to. Honestly, I have to share because having a plug for laptops and a phone charger at arm’s reach is so clutch when there is a sleeping cat on top of you, which for me is basically always. On the side table, I also have a vintage container where I keep the oils for my diffuser and a tray to corral my clickers.

The vintage sconce above the side table is actually Sara’s. I had bought my dream sconce, the Le Klint 204 Mushroom Wall Lamp and it didn’t arrive in time. Actually, quite a few things didn’t arrive because of covid/storms across the US, which was sad but I guess it just means I’ll have to do another photoshoot??

Comforter | Stripe Pillowcases | Quilted Sham (similar) | Quilt (similar) | Faux Leather Lumbar
As far as bedding, I went with mostly solids with different textures. The grey comforter base is Hearth and Hand. I decided for the shoot to purchase 2 king pillows because I realized that the length of the daybed wanted longer pillows. I purchased these terracotta linen stripe pillowcases to bring a little interest. I thought about purchasing a different quilt/sham set so that both sets of pillows were king, but honestly, I like what I have, they are vintage West Elm and I’ve had them for yearsss. They are no longer available but it’s very similar to this quilt and this sham set from Casaluna. I think because it’s supposed to feel like a couch I don’t mind that there are different sized pillows? What do you think? Should I spend $$ so that they match?

My favorite part of the bedding, however, is the throw blanket from heaven. I told Sara that I love it so much that I can’t tell if it is ugly or not, it’s beautiful to me! Of course, we all know and love the faux leather lumbar from Target.

Before moving on, I would be remiss to not mention my FULL COVID HAIR. WHOA. I mean, I knew it was intense but this pushed me over the edge. DIY haircut coming to my insta soon! At least I gave you all a middle part that all the young people think they invented…
The High Shelf

Shelf Brackets | Wood Shelf | Planter | Bookend | Potted Faux Eucalyptus
Not too much to say here, just that I’m a huge fan of a high shelf, especially in smaller spaces that need storage. I’m about to do something similar in my kitchen. If you don’t have a lot of floor space, go up! I bought three 12” brackets from this Etsy shop (currently partially shut down because of weather) and used a beautiful piece of white oak from Ross Alan Reclaimed, cut it to size (from the corner to the end of the bed), made sure to adhere the brackets to studs because this thing is HEAVY and styled away with mostly books (because I don’t have space for a bookshelf and I have so. many. books. My big trick for this shelf is faux plants. 1. It’s dark in here and 2. That shelf is high – I will for sure forget about any plant that is up there and it will die. The one on the right is this super convincing fake by CB2, the one on the left is real from another part of my house because this one hadn’t arrived from Target. I actually previously owned this Hearth and Hand fake but I had to buy it AGAIN because every time I bring it to set someone wants to keep it because it looks that good. I just cut the hang-y things off and cheated it inside of that same planter. I returned the asparagus fern to my bedroom and the shelf is now safe from becoming a plant graveyard. Cutie bookend by West Elm. Wood object is vintage.
Magazine Rack

I know there are going to be questions. This DIY may be the best DIY I’ve ever come up with and made Shade build for me hahahaha. This was one of the first things I envisioned for the space and it turned out SO DAMN NICE and honestly, I didn’t exactly wield the tools myself but I’m gonna make it seem sooooo easy.
These were some of my inspo pics:


I had some leather from the Casaluna Shoot That we did at Sara’s a few months ago so I wanted to try my best at recreating something similar. I looked at these pics and I was like, sure, wood? Screws? Nails? Easy enough. And guess what? It kinda was!
HOW TO BUILD THE SWEETEST MAGAZINE HOLDER OF ALL TIME

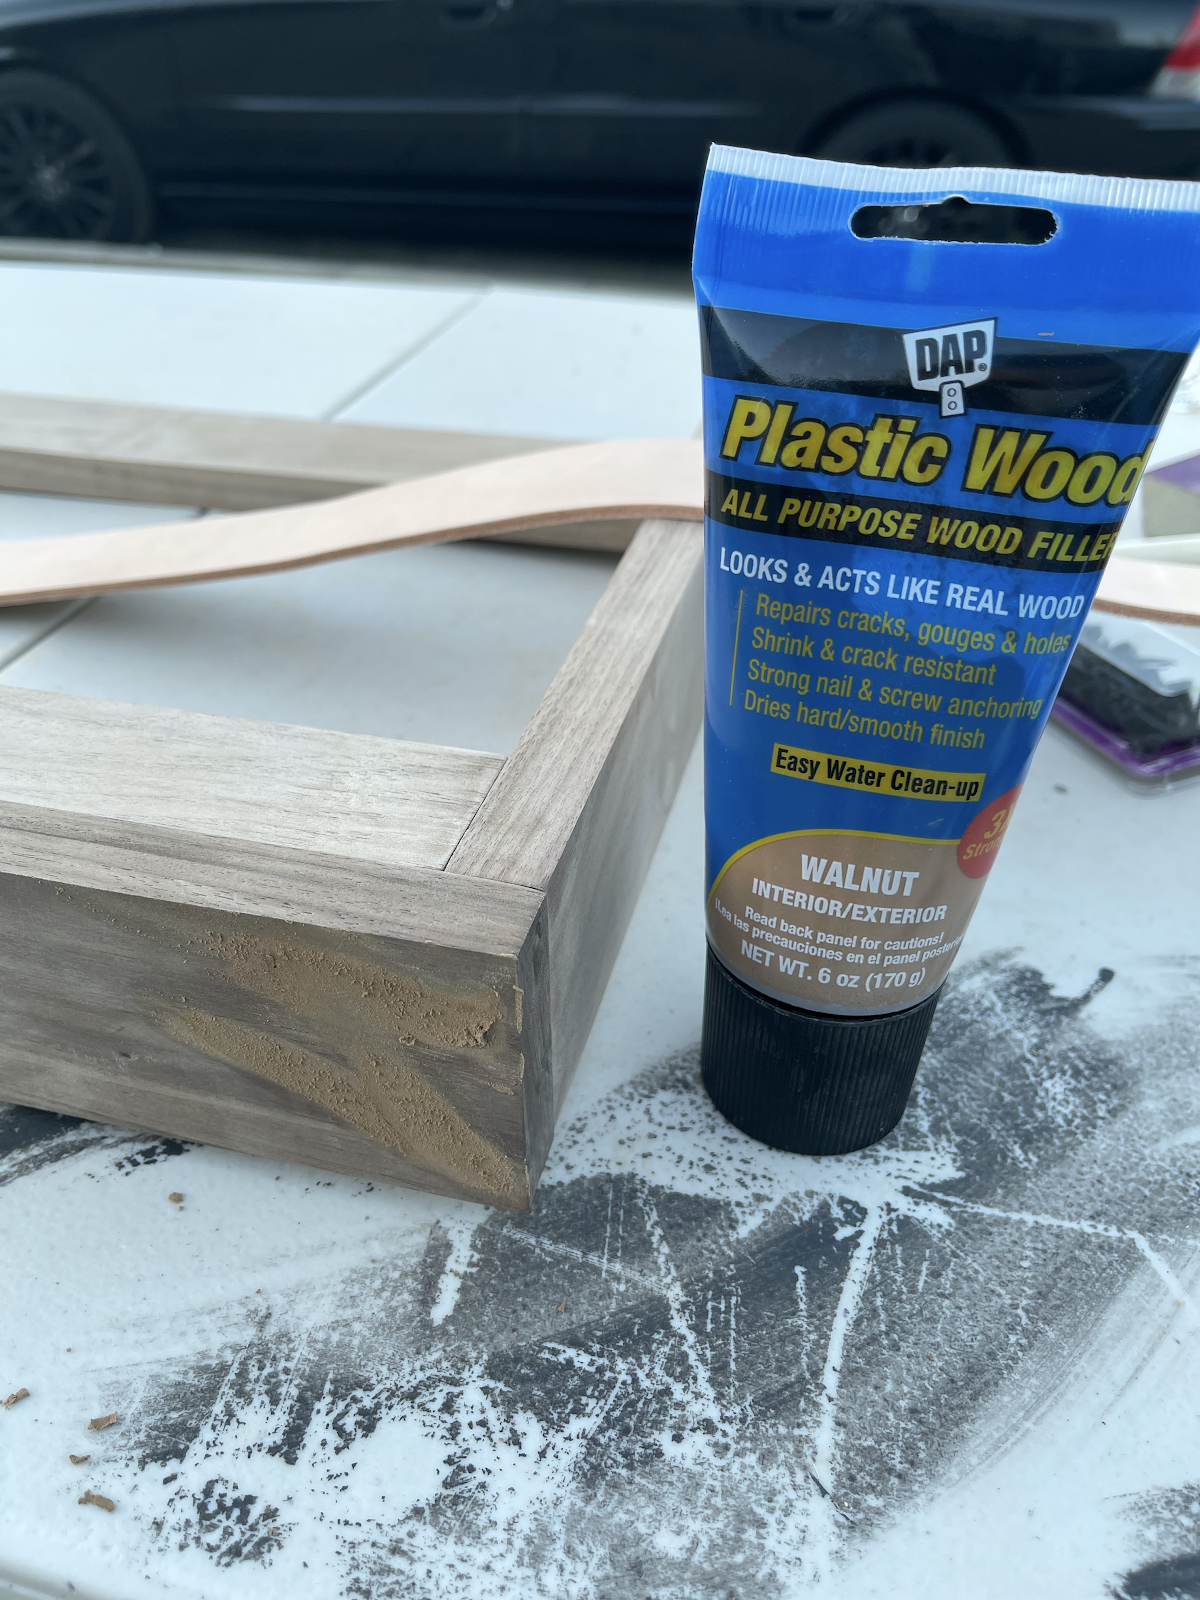
Step 1: Buy wood. I went fancy and bought Walnut wood from my friendly neighborhood Home Depot. 2.5” wide x 0.75” – a few long pieces and one piece of 1.5” x 0.75? (just make sure the pieces are longer than what you need so you can cut them down
Step 2: Determine size. For mine, I wanted it to fit nicely between the two windows with a little breathing room – 44”, and I wanted it to be tall enough to hold some larger magazines I sometimes have – 14”
Should you do step 1 and 2 be swapped? Probably. This is how we did it. I mean, I had an idea of how long I wanted it *holds arms out* This long! Like I said, making it up as I go (an Emily Bowser Story).
Step 3: Cut Wood (see cut pieces above). I had two, 2.5”, cut to 44” for the length. Two 2.5” in cut 13.25” (the 0.75” will be made up by the 13.25” sitting on top of the bottom piece of wood) and one 1.5” cut to 42.5” (this will hold the magazines in at the bottom, sit on top of the bottom piece and between the two side pieces, when next to the side pieces it will be 44” wide. 42.5”+0.75”+0.75” = 44” Stay in school kids! *We used my table saw to cut the pieces.
Step 4: Be an overachiever like our friend Shade and lightly sand the pieces before you put them together (I tried to make him skip this step)! He used my orbital sander with a fine grit paper.


Should fit together like this! Top and very bottom – 44”, sides – 13.25”, mini piece sitting on top of bottom piece – 42.5”
Step 5: Nail gun that ish together!
Step 6: Realize Emily’s nail gun is not as nice as your fancy one (speaking from Shade’s perspective) and walnut is HARD. Drive a half-hour home and a half-hour back.
Step 7: NOW nail that ish together while Emily runs to the closest hardware store to get wood filler because is it really a DIY project if you only had to go to the hardware store ONCE??
Step 8: Fill nail holes and wait 30 mins or so.
Step 9: Lightly sand, wipe with dry cloth
Step 10: Oil, you know, if you want. We used Feed-N-Wax
Step 11: I found the same nails that I *think* may be for laying carpet. I honestly just liked the look of them, they were matte and raw looking. I checked on a spare piece of wood that it wouldn’t split it, I marked the spot I wanted, pre-drilled teeny tiny holes to help the nail along, and carefully nailed one side of the leather in (I used 2” wide), measured to make sure it was level and nailed the other side in. It’s helpful to have someone to hold the leather taught while you do this. And yes IIIII actually did do this part.
Step 12: Carefully drill holes for attaching to wall. We used gold screws I had, with anchors of course, and they blended in pretty well.
Step 13: Attach to wall! YAY!
Window Treatments

If you’re interested in a window treatment tutorial, I may be documenting (made them at night, horrible lighting). They are basically the outside mount version of the ones Orlando made with his mom, and very similar to the ones Julie and I (ok, mostly Julie) made for the mountain house kid’s room but without a liner. They are the same fabric that I used for the temporary wallpaper post and underneath them, I have inside mount, light-blocking roller blinds for when people sleep here or if we are watching TV during the day. The roller blinds are practical, but not cute. When rolled up, the DIY shades act as a valence for covering up the roller blind unsightliness. When down they offer more privacy while still letting light in.
Wall Decor

Above the magazine holder, I have a simple wall grid for pinning my REAL LIFE inspo board. I’m a visual person (obviously) and I’m also tactile. I prefer things I can touch to the digital and flipping through magazines and cutting things out that catch my eye is very relaxing to me. I like how the grid disappears into the wall making the clippings look like they are floating.
The Gym Nook

Wood Hooks | Bala Power Ring | Yoga Rug
Behind the door, I came up with a simple way to store more of my workout stuff. I bought some simple wood hooks and have my resistance bands, yoga rug, and bala power ring (a cute and more versatile version of a kettlebell). It’s nice that it tucks behind the door but I don’t get mad about it when I have to see it either. Little known fact about me, I was a Bar Method instructor for a number of years and actually early in my assisting days with Emily I would teach the very very early morning classes (5:30 WHAT) and then go work on set. The space between the desk and the bed is perfect for teaching myself some classes (with the desk as my makeshift “bar”) or for taking online classes with my former Bar Method bosses who have started their own fitness studio, Chrysalis, when they needed to pivot during the pandemic.

I am also a Peloton spokesperson. Well, unofficially, but, I’m open – HMU. We’ve had ours since the end of 2018 because I was looking for something that wouldn’t take up too much space or be an eyesore. It’s one of the reasons that I like the reason the room is dark, the bike sort of disappears. I have a tray that attaches to the top of it and I will free ride and check emails for about 20 mins in the am and then do a quick 15 min climb with my BFFs Ally Love or Emma Lovewell. It’s a good workout, low impact, doesn’t have a big footprint, and isn’t ugly. If you can finance it, it costs less than a gym membership for 2 people (in LA anyway) and ours is now paid off.
Wait, MORE Art
Of course, I can’t NOT mention the beautiful Minted art (the only items in this room that were gifted). When picking out this art I had a conversation with my friend Orlando about how and when to choose to have something put on canvas and framed vs not (traditional framed art with glass). I had chosen this art and I felt like I wanted it on canvas but wasn’t sure if that was ok. He gave a simple answer that felt like a “duh” moment but I didn’t think of it until he said it. He said, if framing art that looks like it could be painted on canvas, like this “painting” it makes sense to put it on canvas, whereas if it were a modern print that was obviously made digitally, it should not be. I like that rule but also, rules are arbitrary do what you want 

Rosy Tomorrow I and Rosy Tomorrow II by Stephanie Goos Johnson
I actually have a headboard DIY planned (of course I do) but for now, this diptych is holding its place, because we all know how long I take to get to projects. I think they will just relocated next to the Peloton to pretty up that naked corner in the future.

Drop the Ball by Keren Toledano | After the Bath by Patricia Robitaille | Wetland Wall by Field and Sky
The other 3 pieces of art in this shoot are also from Minted. My original idea (to cover up the mess that was made of my walls – thanks gaff tape) was to get the Frame TV and surround it with an entire gallery wall full of art, objects, and vintage mirrors perhaps? Because this is my space and I can take my time, I’m using this as an excuse to slowly build a small art collection. Art (and framing!) is pricey though so this will take a while. As my collection grows I will have no problem integrating the gifted Minted art because the colors and textures are very “me”. In the meantime, I’m really digging this asymmetrical look. I feel like it’s balanced with the flowers, knot, and vintage bird ladder on the opposite side but I feel like it may be controversial. What do you all think?

Alright friends, it’s been fun. Let’s talk about cats, fibroids, my monster of a husband, Pelotons, cats that (figuratively) got away, fuzzy blankets, the solutions to life’s biggest problems, cults, Vampire Diaries (problematic! But Ian Somerhalder!), mancala and I guess design stuff.
Until next time!
Xx
*Photos by Sara Ligorria-Tramp
** Design by Emily Bowser
The post Emily Bowser’s BEAUTIFUL Hardworking, Multipurpose Room Reveal (+ Get Ready For Her DIYS) appeared first on Emily Henderson.
from Emily Henderson https://stylebyemilyhenderson.com/blog/office-guestroom-diy-reveal


No comments:
Post a Comment