
One of the best ways to transform just about anything, is to paint it. Whether you go from dark to light or light to dark, or any hue in between you’re bound to transform a space dramatically with just a couple gallons of paint. The same is true for your kitchen cabinets. Painting cabinets a very specific color has become trendy to bring a custom-looking kitchen to the everyday home. It’s also more cost-effective than replacing your cabinets all together which can run about $10,000 on the low end. Today, I want to give you the 411 on painting your cabinets and getting a factory smooth finish. You will learn about the supplies I used, and every single step in the process from beginning to end. I even discuss refacing your cabinets which is still a cost saver compared to fully replacing them. This post is one you will want to bookmark and save for when you’re ready to tackle this project for yourself. It’s the tell-all for cabinet painting. So enough with the pleasantries, let’s just get to it shall we!?
Refacing Cabinets And Your Style Options
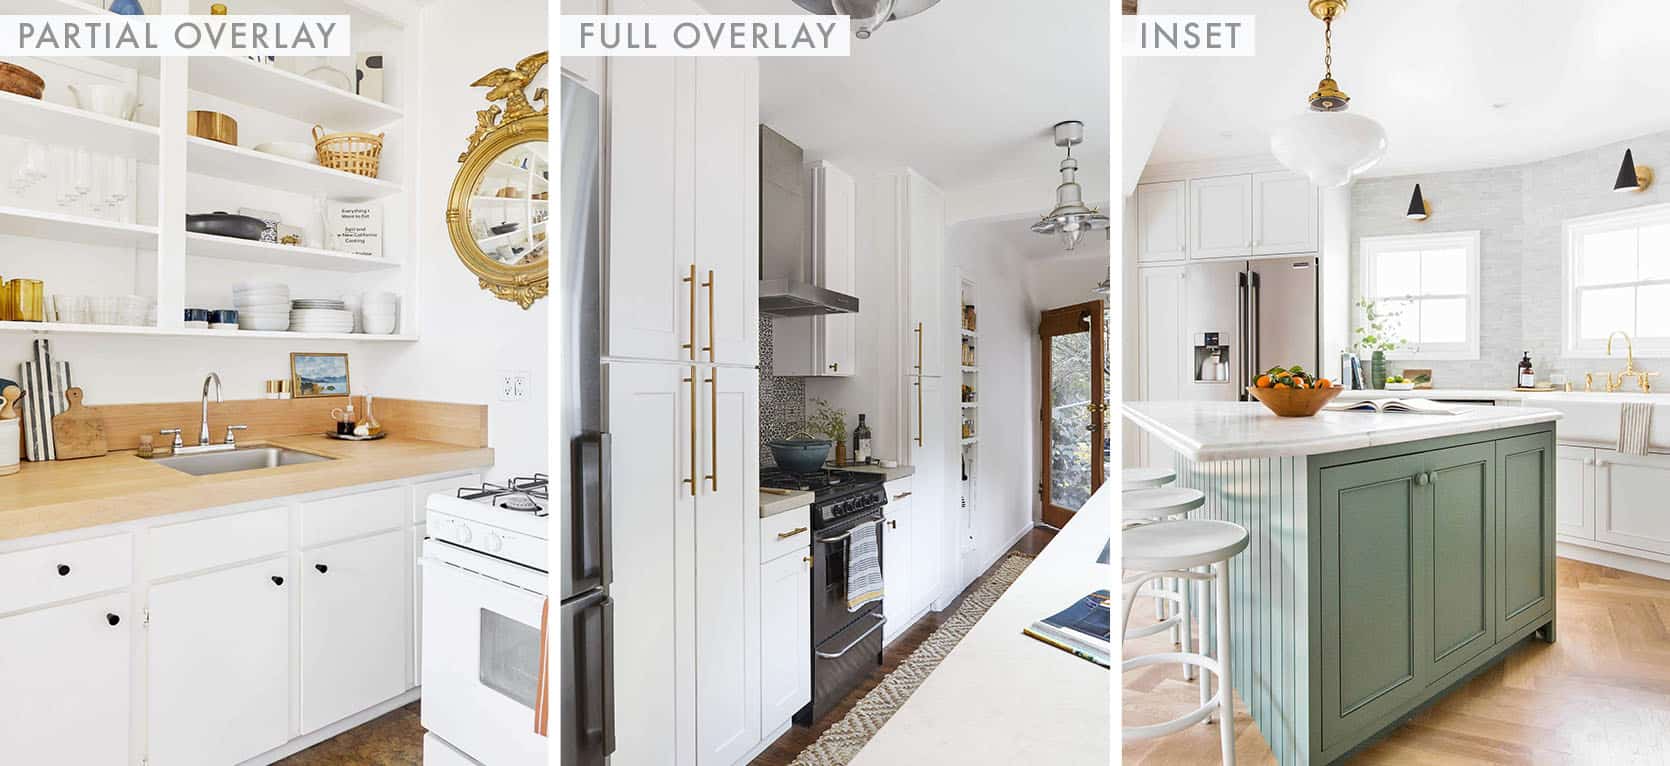
Before we get into the process of cabinet painting, let’s talk through refacing cabinets. Cabinet refacing is the process of changing cabinet doors, drawer fronts, hinges, and/or hardware while keeping the cabinet box (or frame) intact. There are three different fitting options to consider for your cabinet doors: partial overlay, full overlay, and inset. Partial Overlay is when your cabinet doors only cover a part of the frame. Full overlay cabinet doors cover the entire frame, and inset cabinet doors fit flush with the frame and has a more built-in aesthetic.
My former cabinet doors were a partial overlay. And while that’s not a bad look at all, I wanted my kitchen to look and feel more custom. So I decided to reface the cabinets, with new doors that will cover the entire frame. Here are the befores:


I came across a company, Nieu Cabinet Doors, and I love that they make custom cabinet doors for any cabinet frame. Nieu has 16 door styles available to choose from. I knew that I wanted to keep the modern shaker style, but I wanted it to be special so I went with the Super Shaker Style, which has a beveled feature that just elevates the kitchen in an understated way. After sending in my new measurements, it took about 4 weeks for the newly primed doors to arrive. Now keep in mind that if you want to keep the size of your current cabinet doors, and instead just change the style, you can totally do that. There are three reasons why you may want to reface your cabinets: 1. You want to change from partial overlay to full overlay. 2. You want to change the style of your cabinet doors. 3. You want to replace a cabinet door with a cabinet drawer. Nieu gives you the option to have the doors arrive raw, primed, or painted. Yes, you read right, you can totally skip this tutorial and have your new doors painted for you, but where’s the fun in that!? You will only be responsible for painting the cabinet boxes. I’m glad that Nieu Cabinet Doors gives you that option to consider. Definitely, check them out!
Now let’s talking about painting…
Step 1: Organization

1. Sticky Notes | 2. Sharpie
This step is so crucial to the success of cabinet painting. Before removing doors and drawer fronts, even if you’re refacing, you need to label every door by number or letter. This will be considered the “door name”. Naming your doors/fronts will ensure that each door goes back to its original location and there’s no guessing when you’re ready to reinstall. You also want to have a designated drying area, and label each area with its corresponding door name. I also added the name of the door to its corresponding cabinet box. I also kept the hinges and any other hardware with the cabinet box it will be reattached to. Staying organized is KEY!

Step 2: Remove Cabinet Doors And Hardware

Now that you’ve learned about refacing, and labeled and organized your drying station, it’s now time to start removing cabinet doors, hinges, and all other hardware such as knobs and pulls. This process is easier and faster with a drill. Remember to keep your hinges and hardware with the corresponding cabinet box so that reinstallation goes smoothly. If you plan on using new hardware on your cabinet doors, go ahead and fill those holes with wood filler. In my case, I’m using new hinges, so I filled the old hinge holes on the cabinet frame. In this step, you should also use caulk to fill seams in the doors or frames.

Step 3: Cleaning Your Surface For Paint

1. Mixing Bucket | 2. Non-Scratch Scour Pads | 3. 120 Grit Fine Block Sanding Sponge | 4. TSP Heavy Duty Cleaner | 5. Microfiber Towels | 6. Denatured Alcohol| 7. Multi-Purpose Cleaner and Disinfectant
Whether you decide to reface your cabinets or not, you still have to clean your surfaces, and clean them well!! Our cabinets take a beating from everyday use; there’s grease from cooking, fingerprints, dust, and more layers of God knows what! So the cleaning step is important. One may ask, “Why not just skip to the sanding part?” The reason is that you don’t want to press oils or dirt into the wood grain. So scrub and clean first and then sand. I used Spray Nine with a scour pad to first degrease the frames and doors (If you’re refacing you only need to degrease the cabinet boxes, not your new doors). Then after scrubbing the surface I used TSP solution with a microfiber cloth to wipe down the Spray Nine solution. You want to repeat this step on every area that will be painted, that includes any existing trim or moulding.
Step 4: Sand And Prep

1. Drop Cloth | 2. Painter’s Tape | 3. Builder’s Paper | 4. Original Multi-Surface Painter’s Tape
Now that your surface is cleaned and degreased it’s time for prepping your kitchen. I taped off the inside of the cabinets, the floors, the counters, the appliances, doors, and windows. Any area in close proximity to the cabinets that will not be painted, needs to be covered. You will be surprised where paint could end up, so cover up even if you feel like it’s not necessary. For the floors, inside of the cabinet boxes, and countertops, I used painter’s paper. The paper roll comes in various widths so get what works best for your space. For the appliances, windows, doors/doorways I used plastic. You’re probably wondering why I have blue tape and green tape listed, and it’s because they function differently. I used the blue tape to lock down the paper to the floors and to tape the plastic, and the green tape is for extra blocking protection and to create sharp lines. At the toe kick of the cabinet bases, I added the green tape because I didn’t want any paint getting on the new floors. Any area that needs extra protection or sharp crisp lines use the green tape.


Sanding helps the paint adhere best to the cabinets. I started with a 120 grit sanding block to scuff up the cabinet frames. Then I used a dry/wet vacuum cleaner (you can use any vacuum cleaner) with a brush attachment to pick up the dust from sanding. I followed behind by wiping the surface with Denatured alcohol applied with a microfiber cloth.


Step 5: Prime

1. KILZ Interior Primer | 2. Paint Thinner | 3. Paint Brush | 4. Multi-Mix Pail | 5. Velour Rollers | 6. 220 Grit Sanding Block Sponge | 7. Hand-Held Pail with Brush Magnet
If you have wood cabinets, you will need an oil-based primer. I suggest using a respirator mask, or a regular mask with the windows open to protect yourself from the fumes. The smell goes away after a few hours but it is pretty intense so wear a mask. Since oil-based primer is really thick, in a separate plastic container, measure out the amount of primer you need, and then thin the primer by 20% using paint thinner. To apply the primer, use a velour roller and a brush. You want to do this a section at a time. Next, you need to smooth out your roll/brush strokes. Take a fine bristle brush, I purchased mine from a craft store and brush over the area you just primes. This will smooth out the primer, and create a smooth surface when it comes time to paint. If you don’t want to take all that time rolling and brushing, you can also spray the primer on with a paint sprayer.

Once your primer has dried, use a 220 grit sanding block to smooth out paint lines. Vacuum out the dust using a brush attachment, and wipe down your frames and doors with denatured alcohol using a microfiber cloth. You can apply another coat of primer if you need it.
Step 6: It’s Time To Finally Paint!

1. Graco Magnum X5 Sprayer | 2. 311 Tip | 3. Tack Cloth | 4. HomeRight Super Finish Max Sprayer | 5. Respirator Mask | 6. Paper Cups | 7. Benjamin Moore Advance Paint | 9. Painters Pyramid | 8. Painters Pyramid | 9. Graco Truecoat 360 Paint Sprayer | 10. Spray Shelter
Now to the fun part…PAINTING! Everything you’ve done up to this point, is to get a factory smooth finish with your paint. For painting the final color, I highly recommend investing in a paint sprayer. You don’t need a professional-grade sprayer, but you definitely want to spray this finish. Places like The Home Depot have a rental department where you can rent a sprayer but honestly, you can just buy one for the same price you’ll pay in rental fees. I used the Graco Magnum X5 sprayer with the 311 Tip (sold separately), but here are a couple of other cost-effective alternatives that work really well: Graco Truecoat 360 paint sprayer and HomeRight Super Finish Max sprayer. Using a sprayer will make your job so much easier and give you the results you want.
The star of the show is the paint color but most importantly the paint brand and type. I’m using Benjamin Moore Advance Paint in the satin finish. This paint is a waterborne alkyd paint that acts like oil-based paint. The key component to this paint is that it self levels which is the reason why you have to wait 16 hours between coats. The extended open dry time gives the paint time to settle and level out, giving you that factory smooth finish in the end. It does dry to touch in about 3 hours, but it’s best to allow your doors and frames to fully dry before touching them and painting a second or third coat.


My husband and I created a turntable out of wood to make it easier to spin the cabinet doors while painting. It’s so much better spinning the doors than walking around the table. We screwed down paint pyramids to the turntable so that the doors had a raised surface to sit on during painting.


The best technique for painting your doors is to first tack down the surface using tack cloth. This will be your last attempt to fully remove any dust from the surface. Start with the backside of the door first (do both coats) and then flip to the front side of the doors. I prefer to spray the doors laying horizontally versus hanging them to avoid runs (see Em’s Instagram for a demonstration). Once you’re finished, carefully slide your hands underneath the doors, and place the door in its designated drying area. As you will see below, I used cups to elevate the doors while drying. You can use paint pyramids but you will have to buy a lot. The cups were a great alternative. Then move on to the next. It took approximately an hour and a half to two hours to spray each coat. It may take you less time or more time. Don’t rush this part. Take your time to avoid making mistakes.


While the doors dried, I masked off the kitchen area with more plastic and sprayed the cabinet boxes. I’m so glad I did because the process took about 30 minutes to spray vs hours with brushing or rolling. Use whatever method is convenient for you. Repeat the paint process one more time with a second coat. The doors took 4 days to paint: The first two days were for the backside, one coat per day, and the last two days, for the front side, one coat per day. It is not necessary to sand between coats, however, if you see any small imperfections, used a 320 grit sanding block to smooth it out. Remember if you decide to sand, you have to use the vacuum to pick up the dust, and tack the door or frame with tack cloth before applying paint.
Step 7: Reinstall Your Cabinet Doors
When using Benjamin Moore Advance Paint you want to be sure to leave the doors to dry for about 2-3 days before handling them. It takes 30 days for the paint to completely harden, so be gentle with your newly painted cabinets once reinstalled. Use gloves when reinstalling because who wants fingerprints on their newly painted doors??
Speaking of newly painted doors:)


I am so happy with how it turned out. Yes this may be a long process, but it’s doable and will save you a lot of money doing it yourself.
Let’s Talk Dollars And Cents
Let’s take a look at the cost breakdown and comparison. The total cost of paint supplies for the entire project came to about $700. And a big chunk of that amount went towards investing in an airless paint sprayer (about $350). In the Washington DC area, it costs about $3200 on average to have your cabinets professionally painted. That’s a savings of $2500 that can be saved or allocated to other things on your renovation budget. Now, I did opt to get my cabinet doors refaced and primed which cost a little over $2000. The cost to get brand new cabinets on the lower end is $10,000. Refacing my cabinets, and painting them myself saved me $7,300. To add an even more custom look to my cabinetry, I hired a subcontractor to add double crown molding to my bulkheads to make it appear as if my cabinets go all the way to the ceiling, trim to my side panels and build out a shelf for a microwave in my peninsula. The cost of labor and materials came to $1000. But I still saved a ton of money. Doing things yourself may cost you time, but the savings in money can allow you to bring more custom elements to your kitchen.

I hope this post gives you the knowledge and confidence to do this yourself. Painting your cabinets can really transform your kitchen in a major way. As always if you have questions, you can ask them in the comments section, DM me on Instagram or email me. I’m always happy to answer and help. Now I’m going to wait a few more days before installing my unlacquered brass hardware from Rejuvenation. It’s the jewelry to the cabinets. My next post will be the kitchen reveal, so stay tuned for that!
The post The RIGHT Way To Paint Your Kitchen Cabinets and Save $$$ (Factory Finish Guaranteed) appeared first on Emily Henderson.
from Emily Henderson https://stylebyemilyhenderson.com/blog/diy-painting-kitchen-cabinets


No comments:
Post a Comment